![I asked for "up to 10 items," but got 40, so I had AI fix the generated code [Bright Data Scraper Studio]](/assets/bright-data-scraper-studio.Bs2StY_f_Z1IoGGs.avif)
PR
This article was written after joining a Bright Data project and actually operating Scraper Studio. The evaluations in the article are based on tests the author performed as of July 2026.
Introduction
Every time I scrape a new site, I open the HTML, hunt for selectors, write code, and if it doesn’t work, I head back to DevTools again.
As the number of target sites grows, it gets quietly heavy—not just selector research, but also scheduled runs and API integration.
So this time, I actually used Bright Data’s Scraper Studio, which can generate scrapers from a URL and natural language.
I first checked the basic generation ability on a practice site for scraping, then tried a real site I often read, GIGAZINE, to see whether Japanese instructions would work too.
To get to the point first: generating and running the scraper finished pretty quickly.
That said, not everything worked perfectly on the first try.
Even though I asked for “up to 10 items,” it returned 40 items.
After that, I checked the generated JavaScript, asked Self-Healing to fix it, reviewed the diff, and applied it. That finally limited the output to 10 items.
In this article, I’m including not only what went well, but also the parts where I actually got stuck.
What I checked this time
I mainly checked the following:
- Can it generate a scraper from a URL and natural language?
- Can it interpret Japanese instructions as well as English?
- Can I review and modify the generated schema and JavaScript?
- Can AI code fixes be applied only after checking the diff?
- Can it output results in formats other than JSON?
- Can it be connected to scheduled runs and API usage?
The two sites tested were:
| Target | Purpose |
|---|---|
| Books to Scrape | Check basic extraction and type conversion |
| GIGAZINE | Check whether it works on a real Japanese site |
For GIGAZINE, I only targeted the top page and did not open individual article pages.
Opening Scraper Studio
From the Bright Data dashboard, open “Scrapers,” then go to the AI creation screen from the create-new button in the top right.
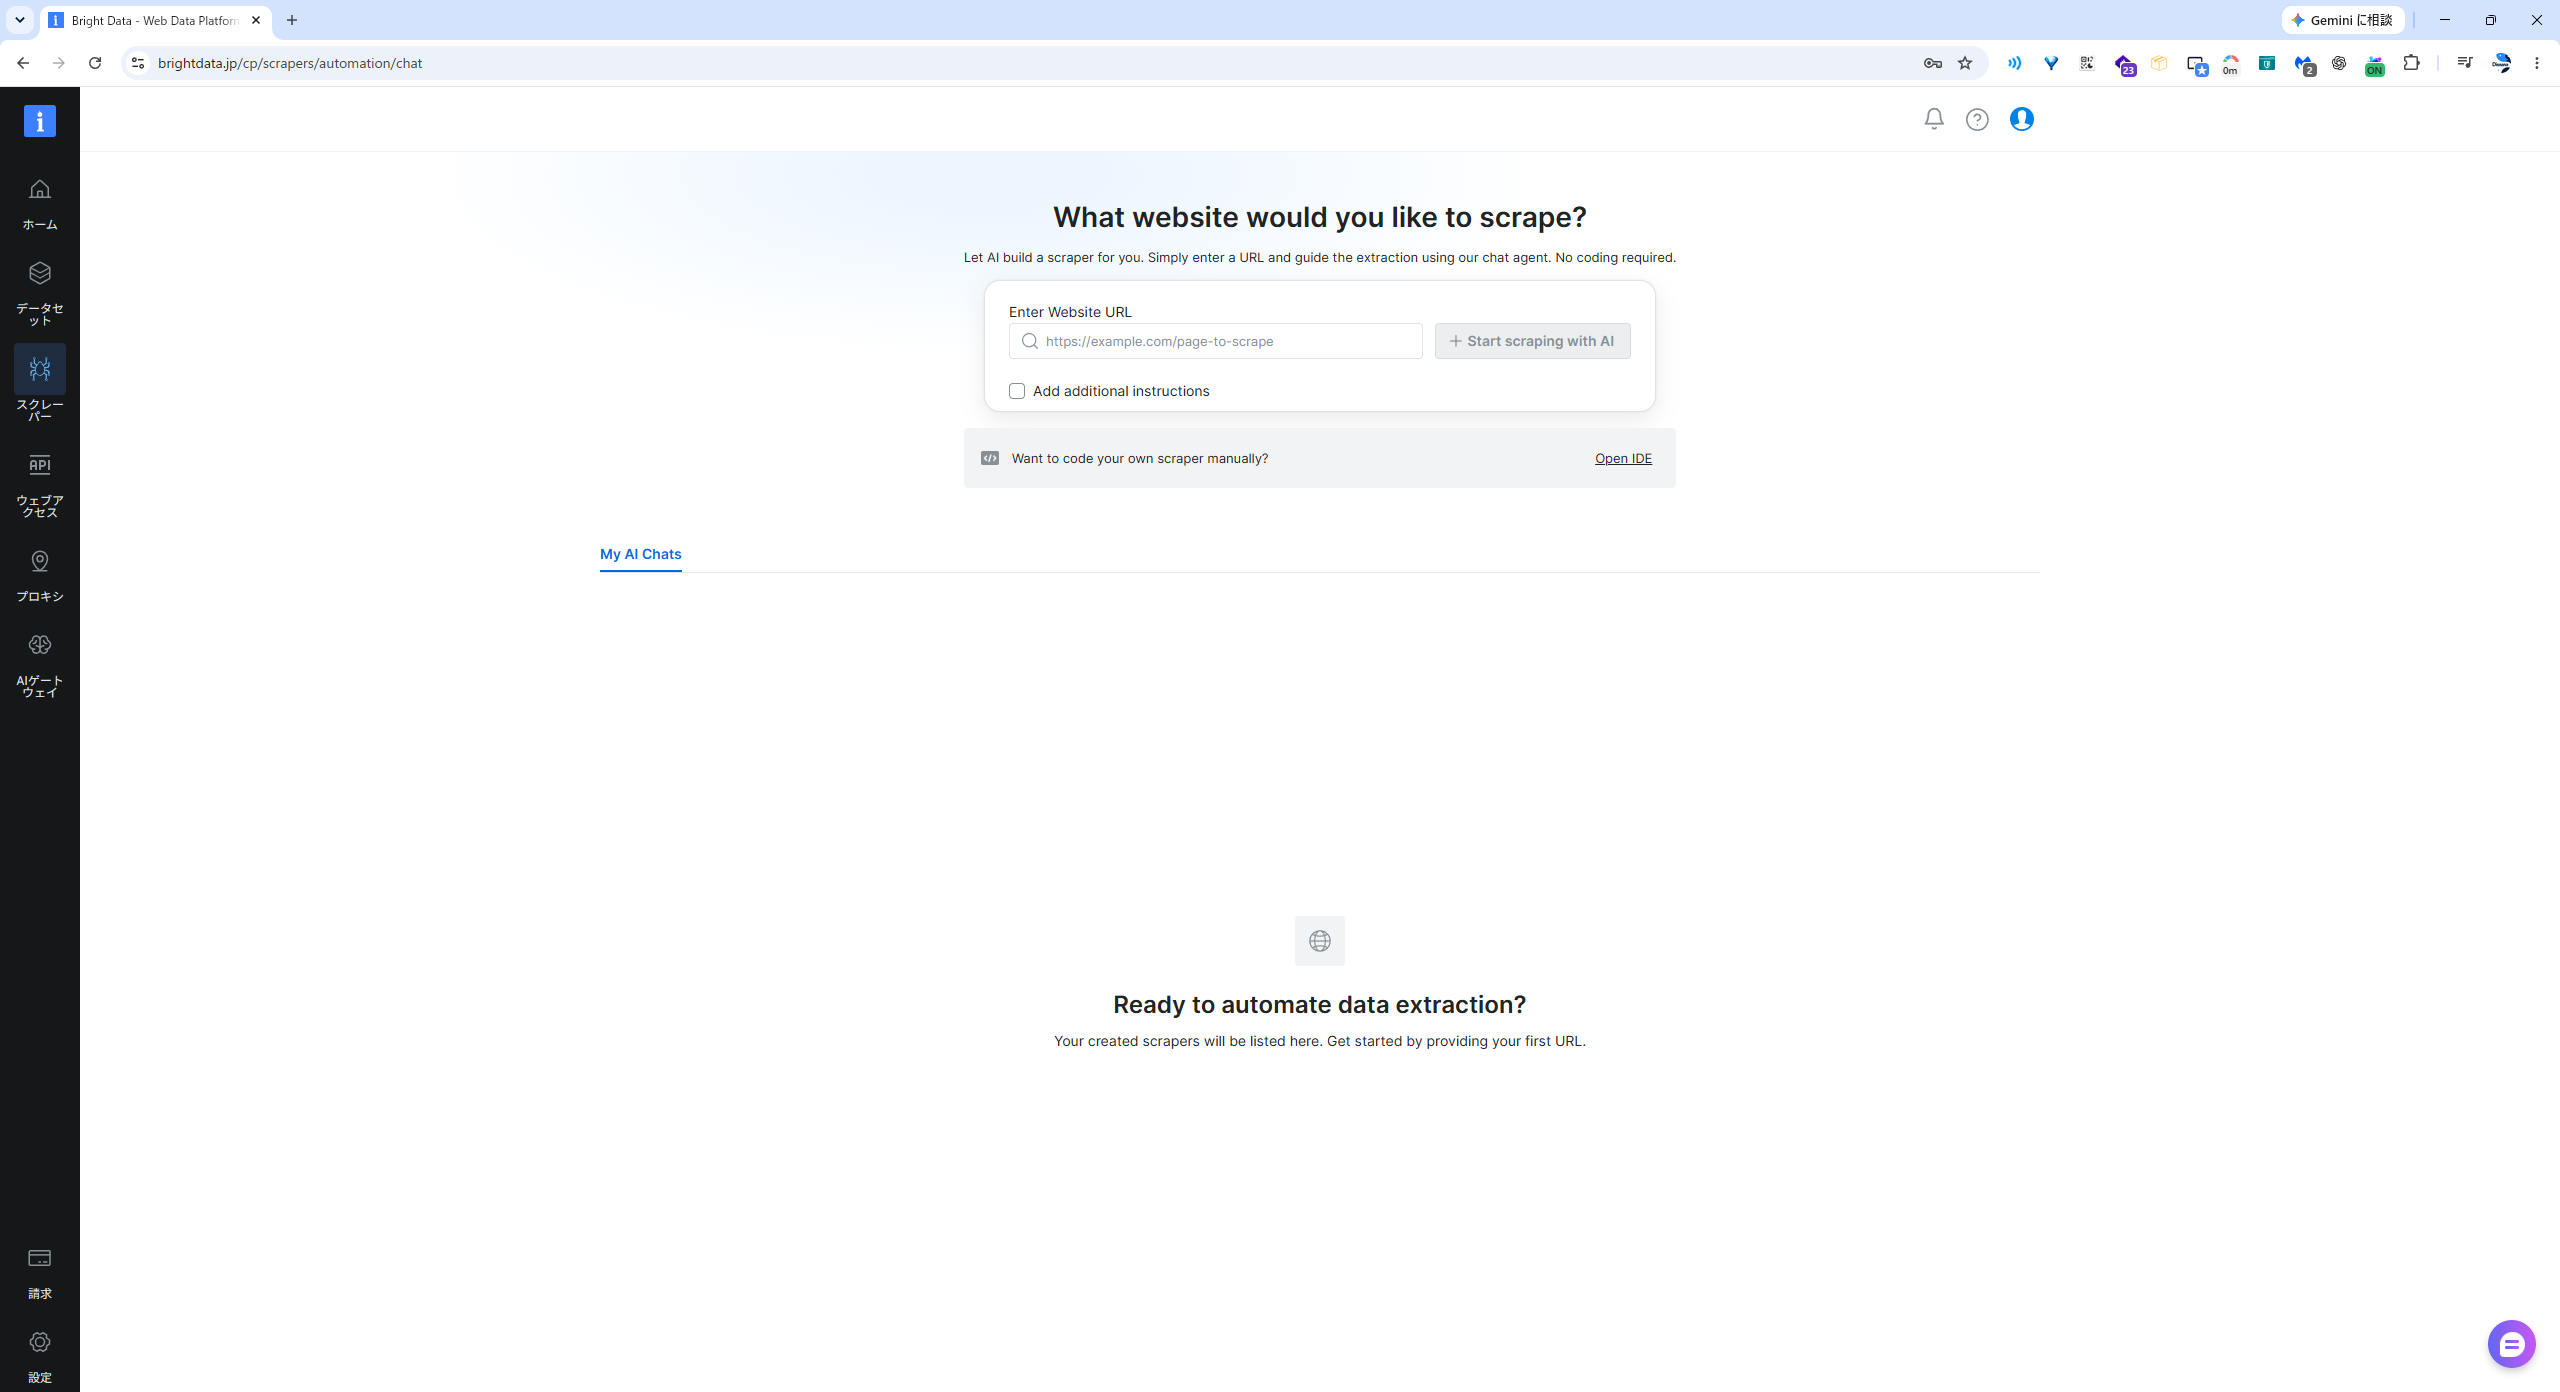
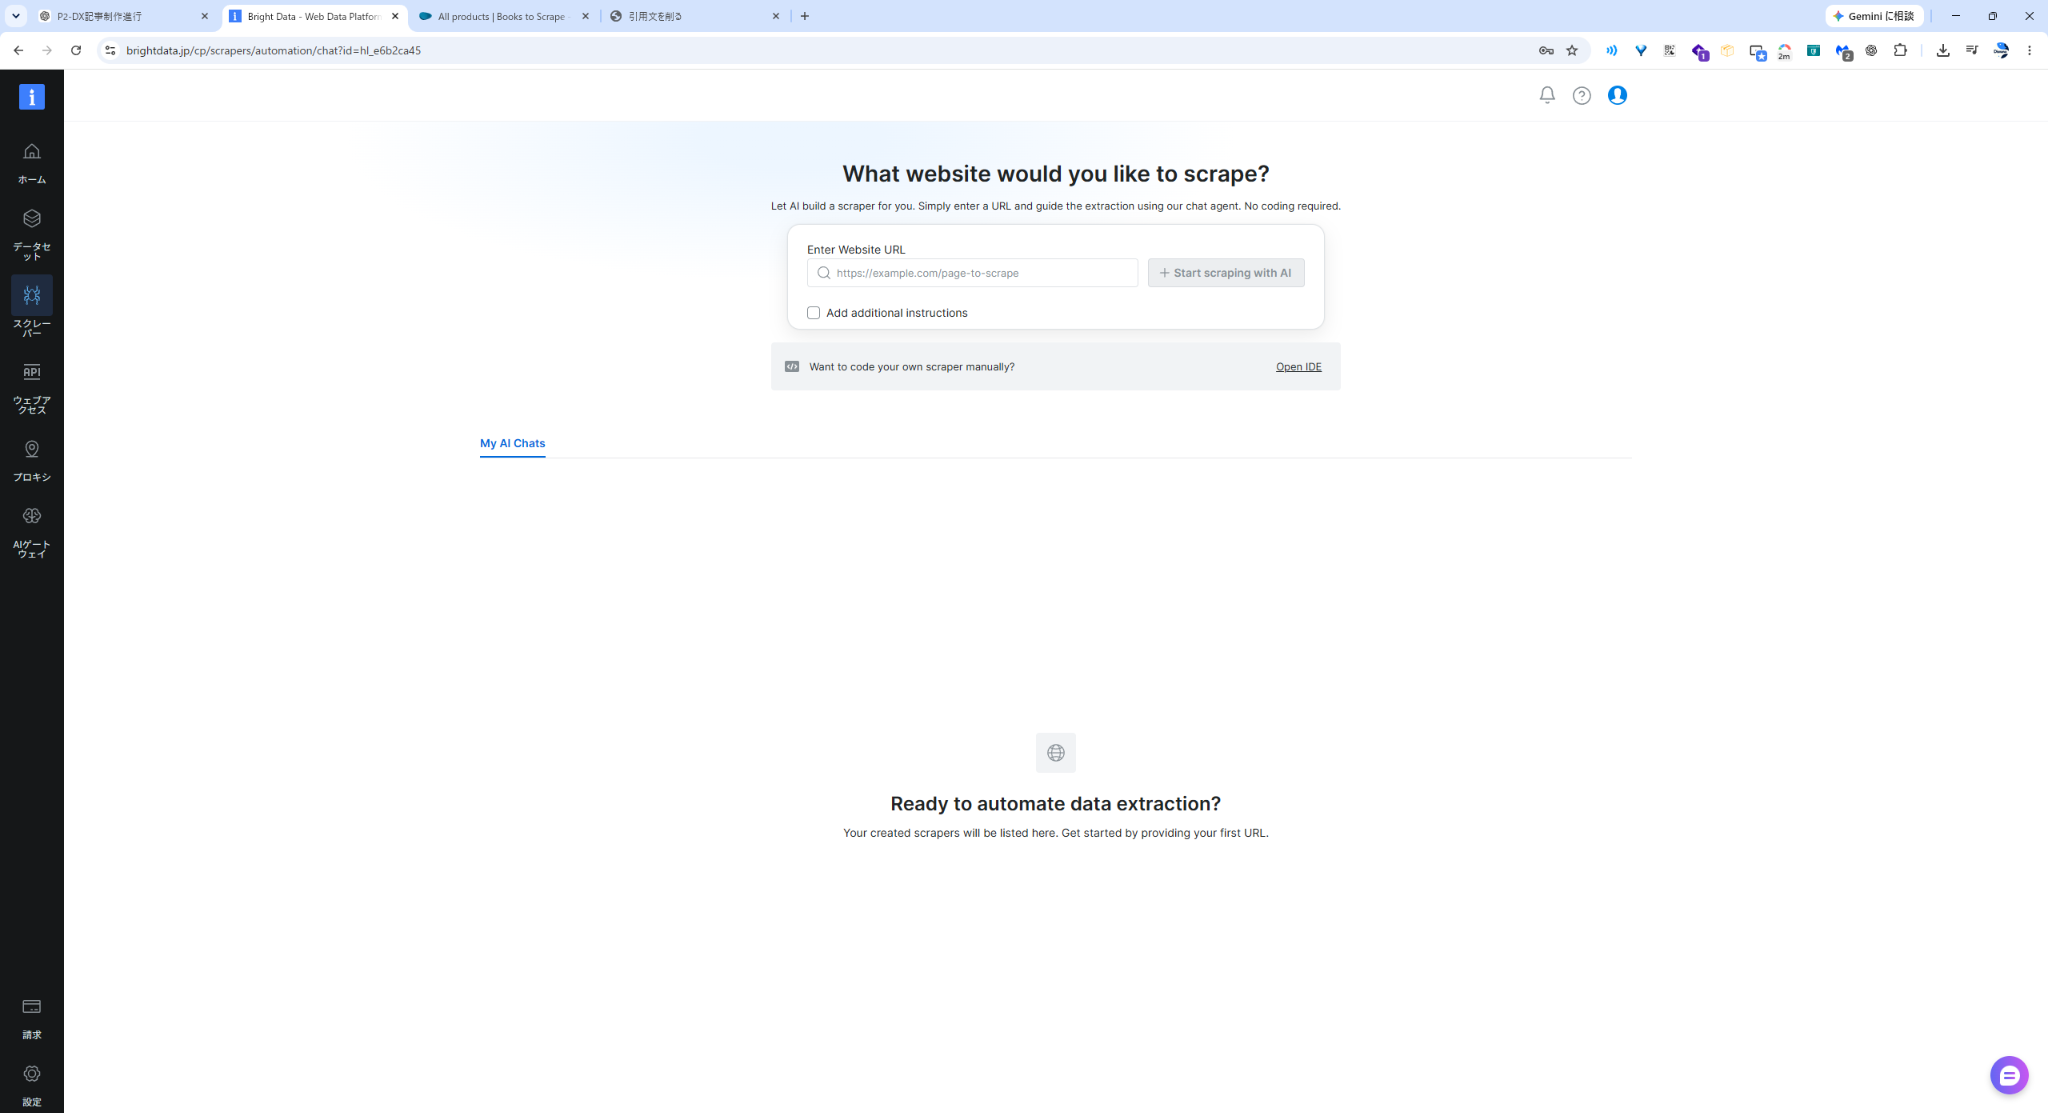
On the create-new screen, you can enter the target URL and extra instructions.
First, test the basic ability in English
If I start with Japanese and a real site, it becomes harder to isolate the cause when something fails.
So first I used Books to Scrape, a practice site for scraping, and gave instructions in English.
The target URL was:
https://books.toscrape.com/The instructions I entered were:
Extract every book shown on the current page.

Return one record per book with these fields:

・title: book title
・price_gbp: price as a number without the £ symbol
・availability: stock availability text, trimmed
・rating: star rating as an integer from 1 to 5
・product_url: absolute URL to the book detail page
・image_url: absolute URL to the book cover image

Requirements:

・Keep the field names exactly as written above.
・Return all books displayed on the current page.
・Do not return relative URLs.
・Do not include extra fields.
The AI Agent didn’t immediately start writing code. Instead, it asked whether I wanted only the listing page, or whether it should open each book’s detail page, and whether pagination should be used.
Since this was a minimal test, I replied like this:
Extract data only from the listing page.

Do not open each book's detail page.

For this first test, scrape only the first page and return all books shown on it.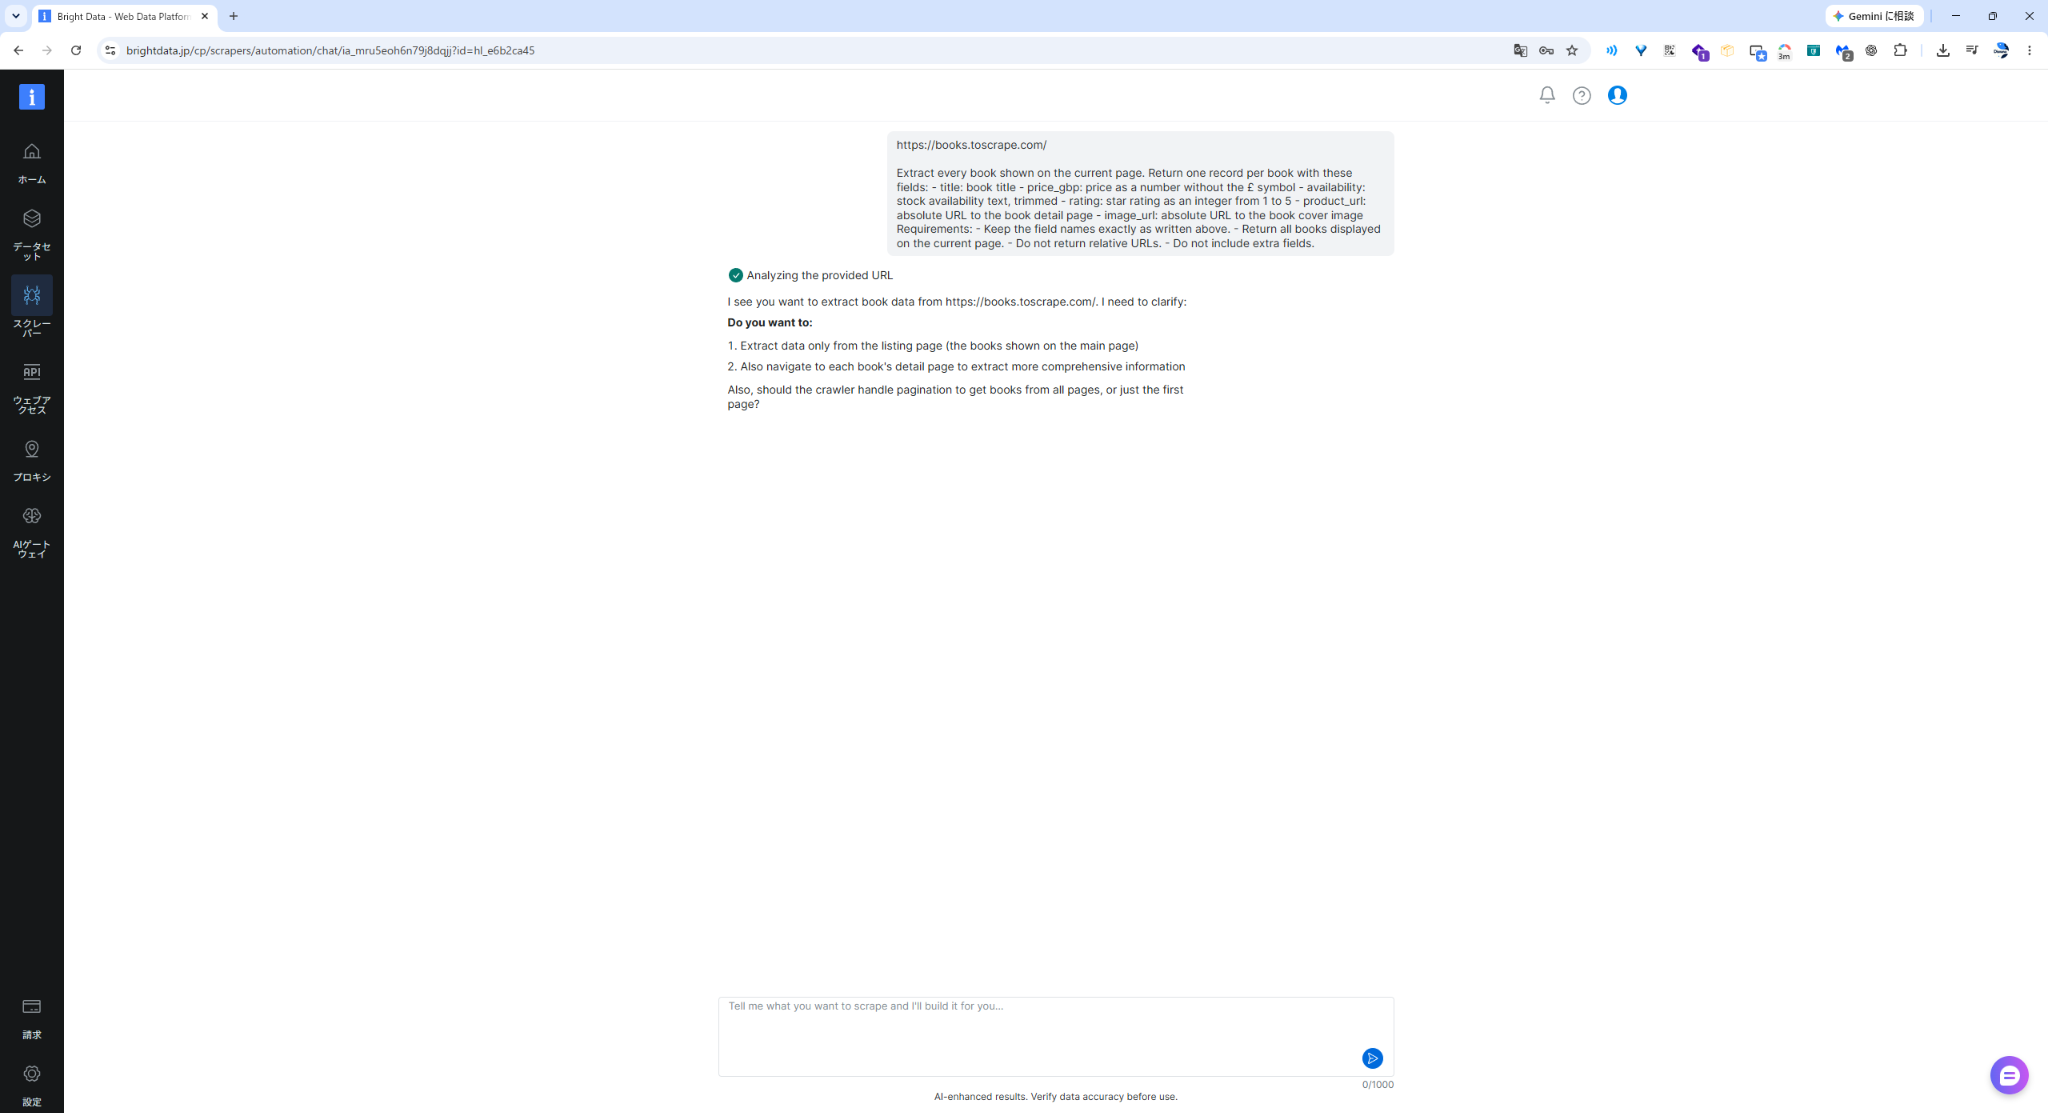
I liked that it asked about the scope instead of going off and crawling all pages on its own. That makes it harder to accidentally increase page loads or the target scope.
Checking the generated schema
After the instructions, the AI Agent generated the output schema.
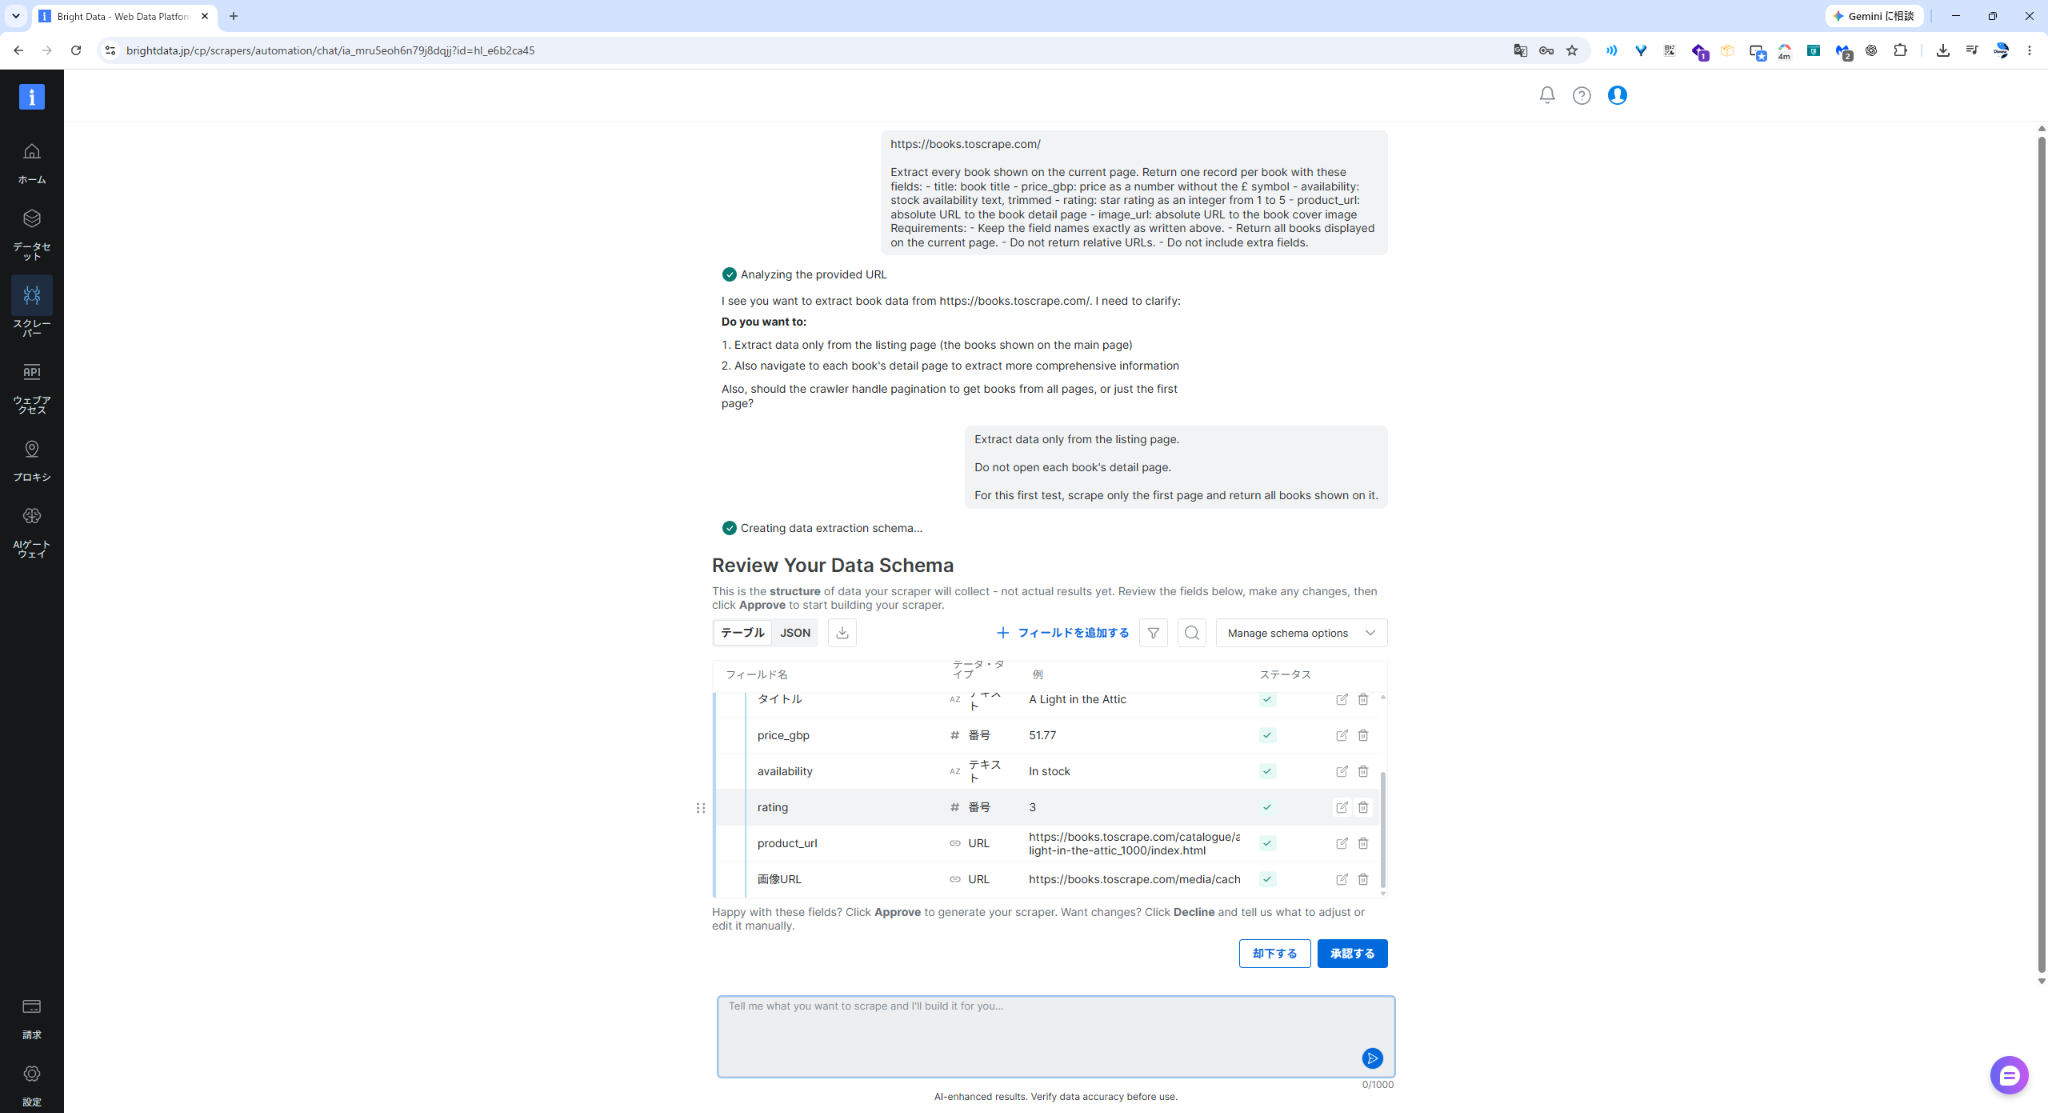
The main structure generated was:
{
  "books": [
    {
      "title": "text",
      "price_gbp": "number",
      "availability": "text",
      "rating": "number",
      "product_url": "url",
      "image_url": "url"
    }
  ]
}
Price was defined as a number, rating as a number, and the product page and image as URL types.
The field descriptions also included the CSS selectors to use for extraction, and the policy for converting star ratings from One to Five into 1 through 5.
At this stage, I didn’t make any manual edits and just approved it as-is.
The first run returned 20 items
When I ran the generated scraper, it extracted the 20 books shown on the top page.
The first record looked like this:
{
  "title": "A Light in the Attic",
  "price_gbp": 51.77,
  "availability": "In stock",
  "rating": 3,
  "product_url": "https://books.toscrape.com/catalogue/a-light-in-the-attic_1000/index.html",
  "image_url": "https://books.toscrape.com/media/cache/2c/da/2cdad67c44b002e7ead0cc35693c0e8b.jpg"
}
From what I checked, it met these conditions:
・It extracted all 20 items
・It output the six fields I specified
・It removed £ from the price and converted it to a number
・It converted the rating to a number from 1 to 5
・It turned the product URL and image URL into absolute URLs
Even though it was a practice site, the first generation got me to the shape I wanted.
If you want to try it for testing
If you sign up for Bright Data from this dedicated link, you can use 5,000 free requests per month.
If you want to try Scraper Studio, you can first check actual scraping and behavior within the free quota.
Would it work in Japanese, too?
After confirming the basic behavior in English, I tried Japanese next.
The target was GIGAZINE. I chose it because it’s a site I usually read, so it would be easy to visually verify the extracted results.
What I entered was:
現在のトップページに表示されている記事一覧を取得してください。

各記事について、次の項目を抽出してください。

・title: 記事タイトル
・article_url: 記事ページの絶対URL
・published_at: 表示されている公開日時
・category: 表示されているカテゴリ。取得できない場合はnull
・summary: 一覧に表示されている記事概要。取得できない場合はnull
・thumbnail_url: サムネイル画像の絶対URL。取得できない場合はnull

以下の条件を守ってください。

・現在のトップページだけを対象にする
・各記事の詳細ページは開かない
・ページネーションや無限スクロールは行わない
・最大10件まで取得する
・フィールド名は上記の英語名を維持する
・記事本文全文は取得しない
・URLは相対URLではなく絶対URLにする
・指定していないフィールドは追加しない
The first attempt gave an Internal Server Error
First run of the Japanese prompt failed
Internal Server Error appeared. However, when I ran the same Japanese prompt again, it successfully progressed to schema generation.
Since the English version succeeded first, I briefly suspected Japanese, but I only tried each condition once. It may have been a temporary error rather than something language-related.
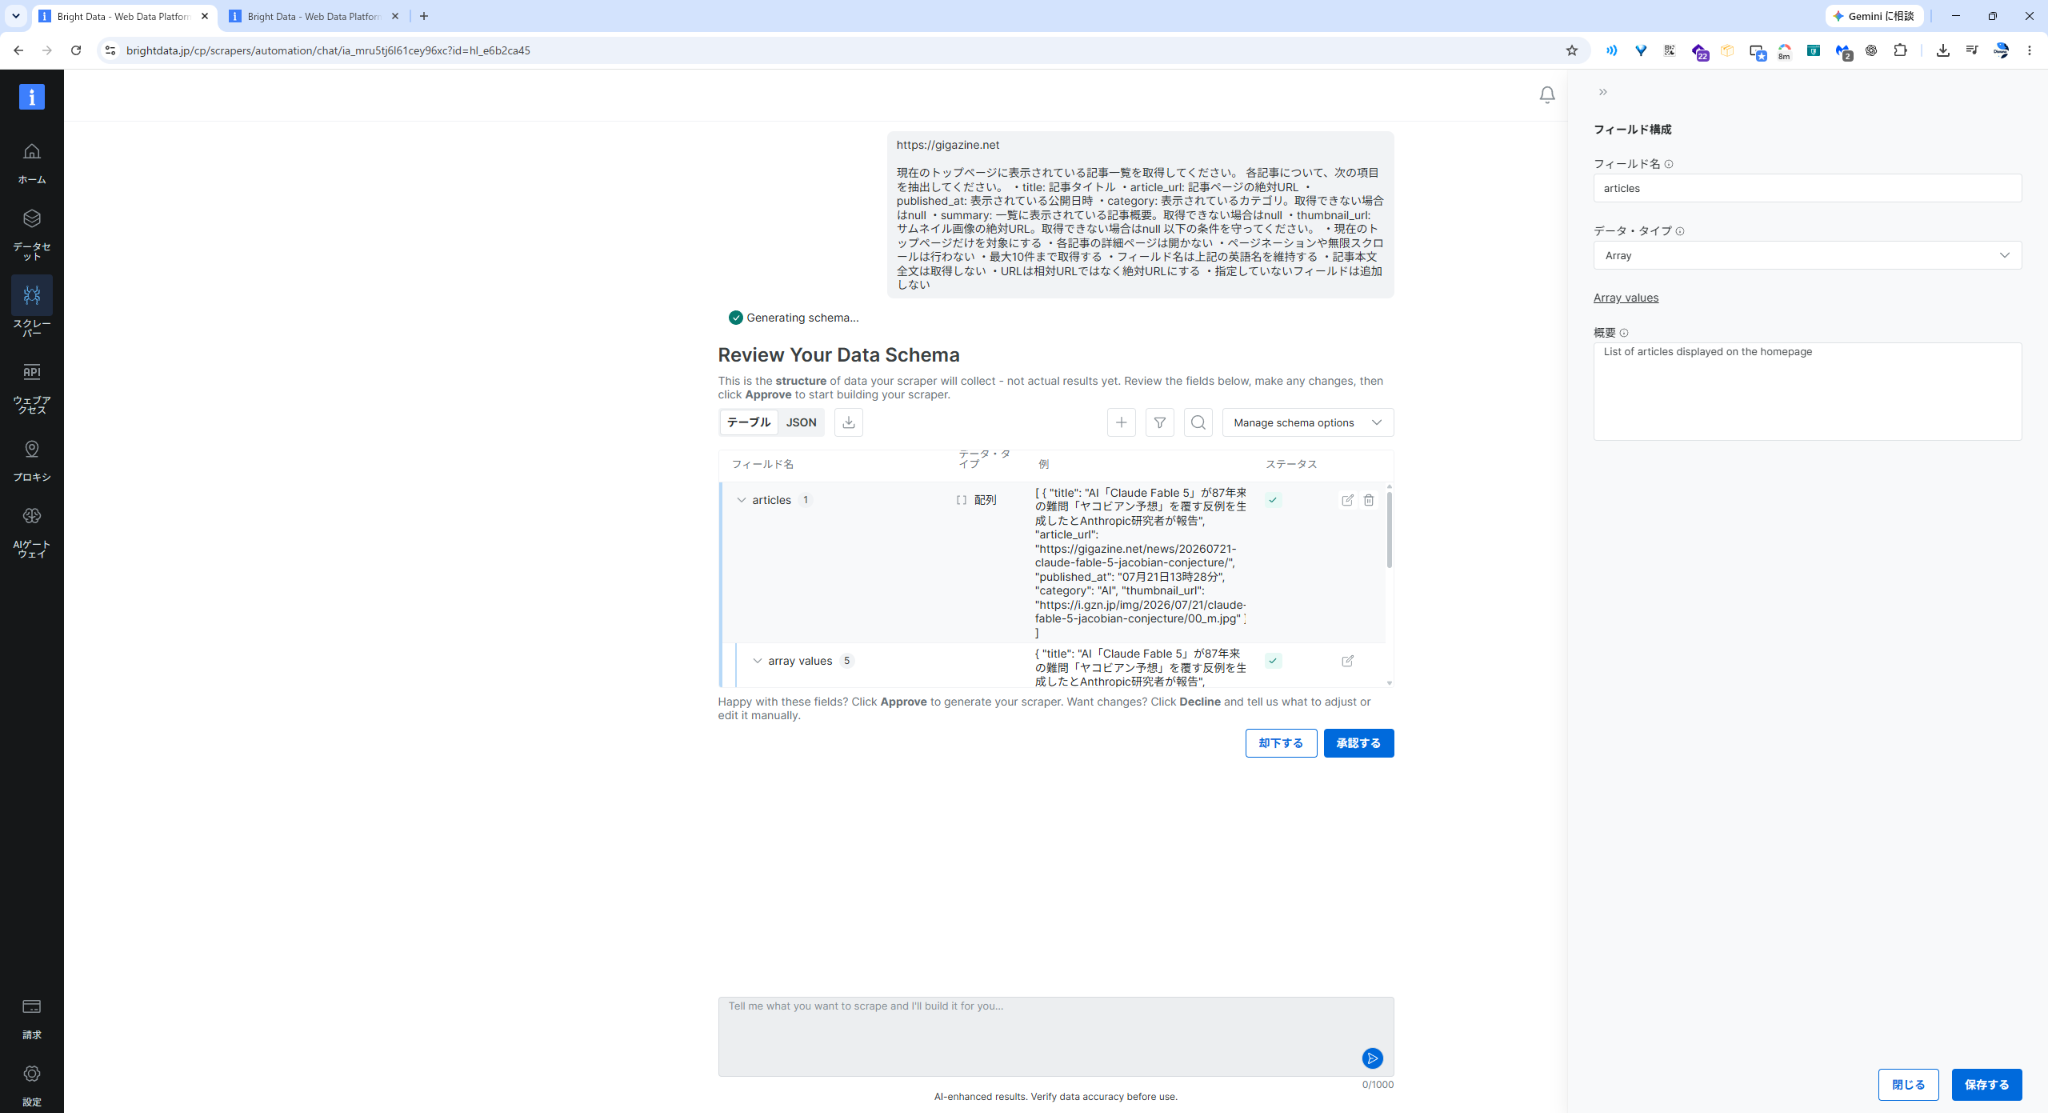
There was a small schema difference between Japanese and English
Both the Japanese and English versions recognized the article title, URL, publication date, category, and thumbnail URL.
The initial schema was almost the same, but thumbnail_url was generated as image in the English version and url in the Japanese version.
That said, since I generated each language only once, it’s more reasonable to treat this as variation at generation time rather than a language difference.
Also, in the initial generation, summary was missing from both.
When I asked again in the English version to add summary, this time the same field was generated both at the top level and inside the articles array.
In other words, it was duplicated like this:
{
  "title": "...",
  "summary": "...",
  "article_url": "...",
  "articles": [
    {
      "title": "...",
      "summary": "...",
      "article_url": "..."
    }
  ]
}
For a use case that returns multiple articles, a top-level single-article field isn’t needed.
So I gave an additional instruction to remove the top-level duplicate and keep it only inside the articles array.
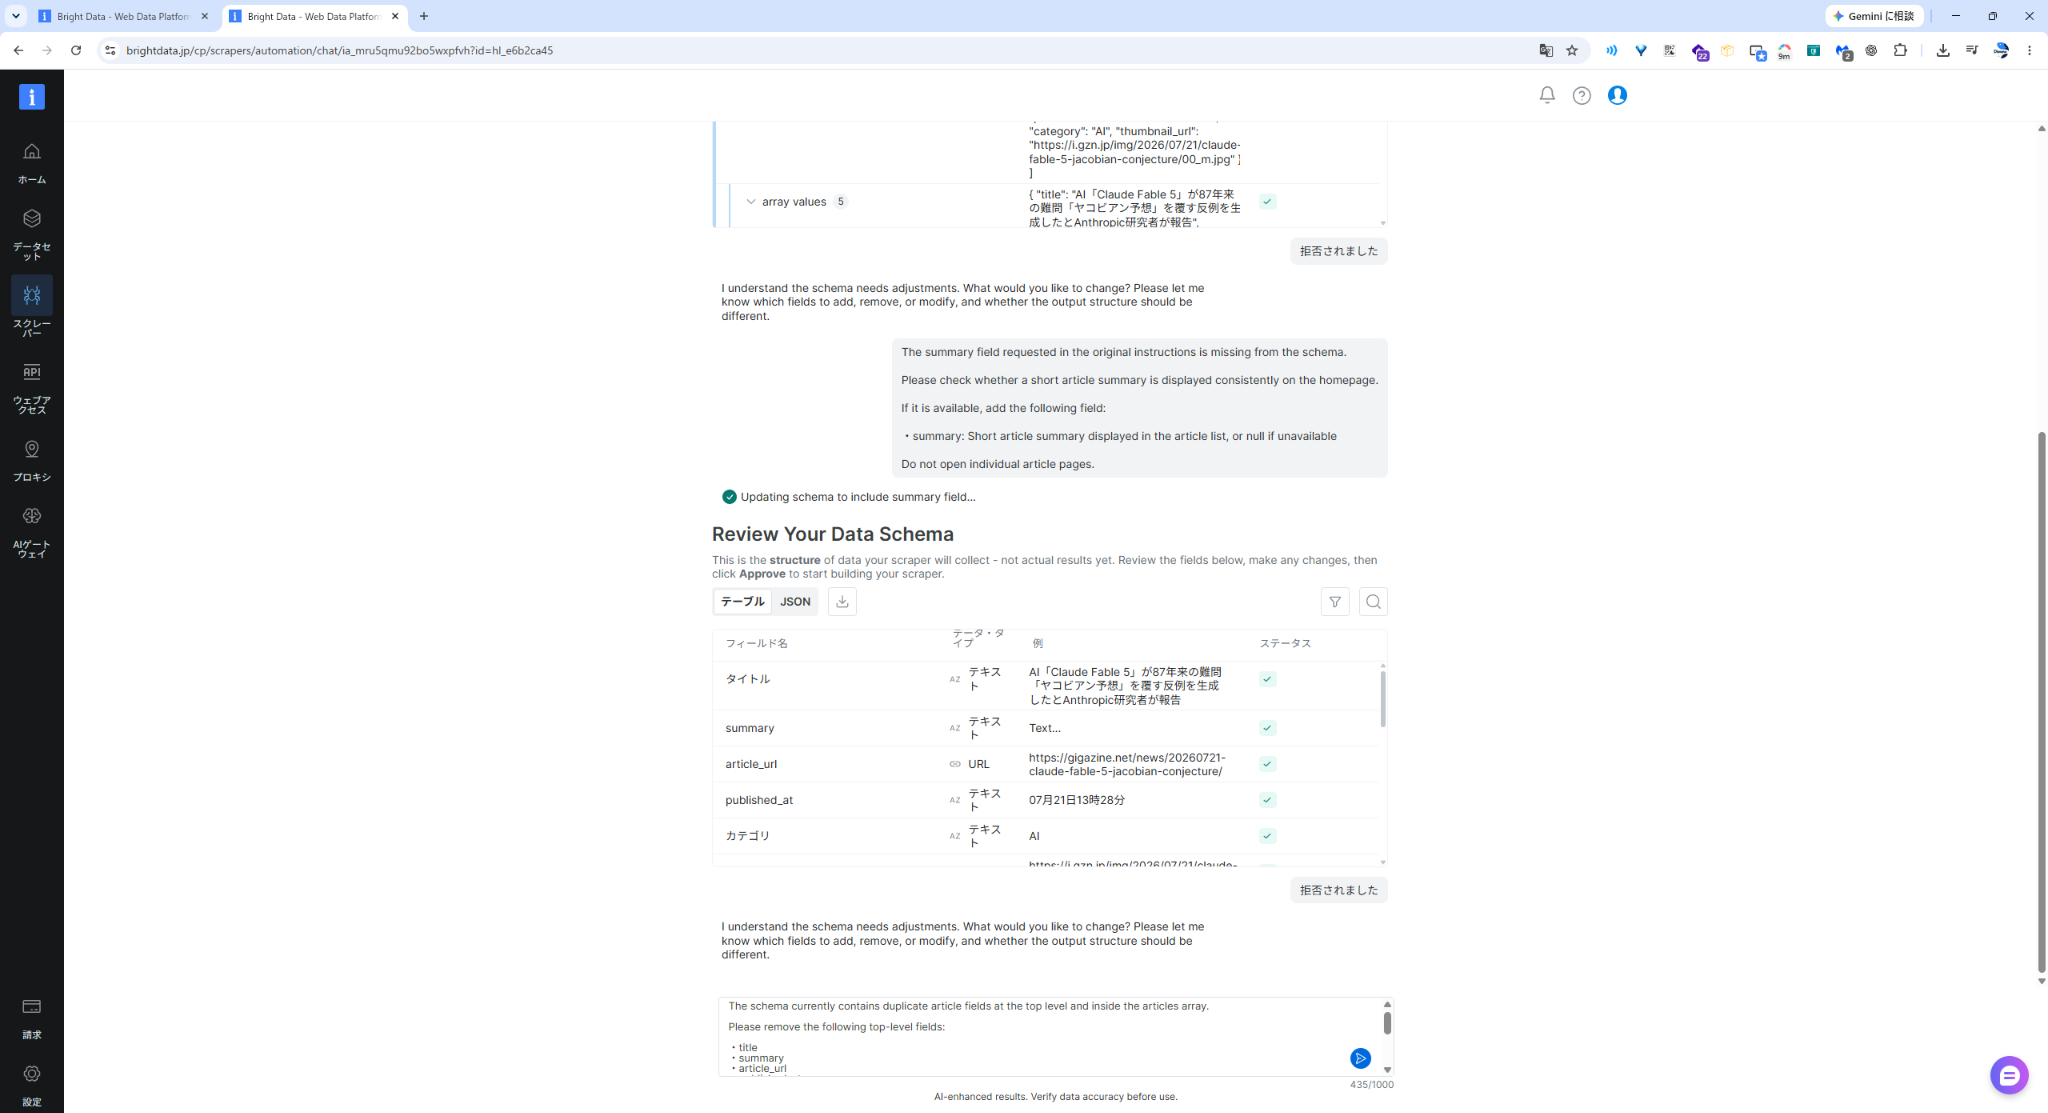
After the fix, it became this structure:
{
  "type": "object",
  "fields": {
    "articles": {
      "type": "array",
      "items": {
        "type": "object",
        "fields": {
          "title": {
            "type": "text"
          },
          "summary": {
            "type": "text"
          },
          "article_url": {
            "type": "url"
          },
          "published_at": {
            "type": "text"
          },
          "category": {
            "type": "text"
          },
          "thumbnail_url": {
            "type": "image"
          }
        }
      }
    }
  }
}
It’s convenient that it can create a schema from natural language, but after additional edits, it still looks like a good idea to check the structure.
It looked done, but it returned 40 items
I approved both the Japanese and English versions and ran them.
The title, URL, publication date, category, and thumbnail URL were all being extracted without issues.
From here on, the code review and Self-Healing were done using the English version of the generated scraper.
Here’s the miscalculation
Even though I specified up to 10 items, the execution result was 40 items.
Seeing 40 items made me wonder if it was opening each article’s detail page.
But when I checked the generated code, it was only loading the top page once and extracting the 40 article cards on it.
Reading the generated JavaScript
If you open “Code” from the scraper detail screen, a hosted IDE appears.
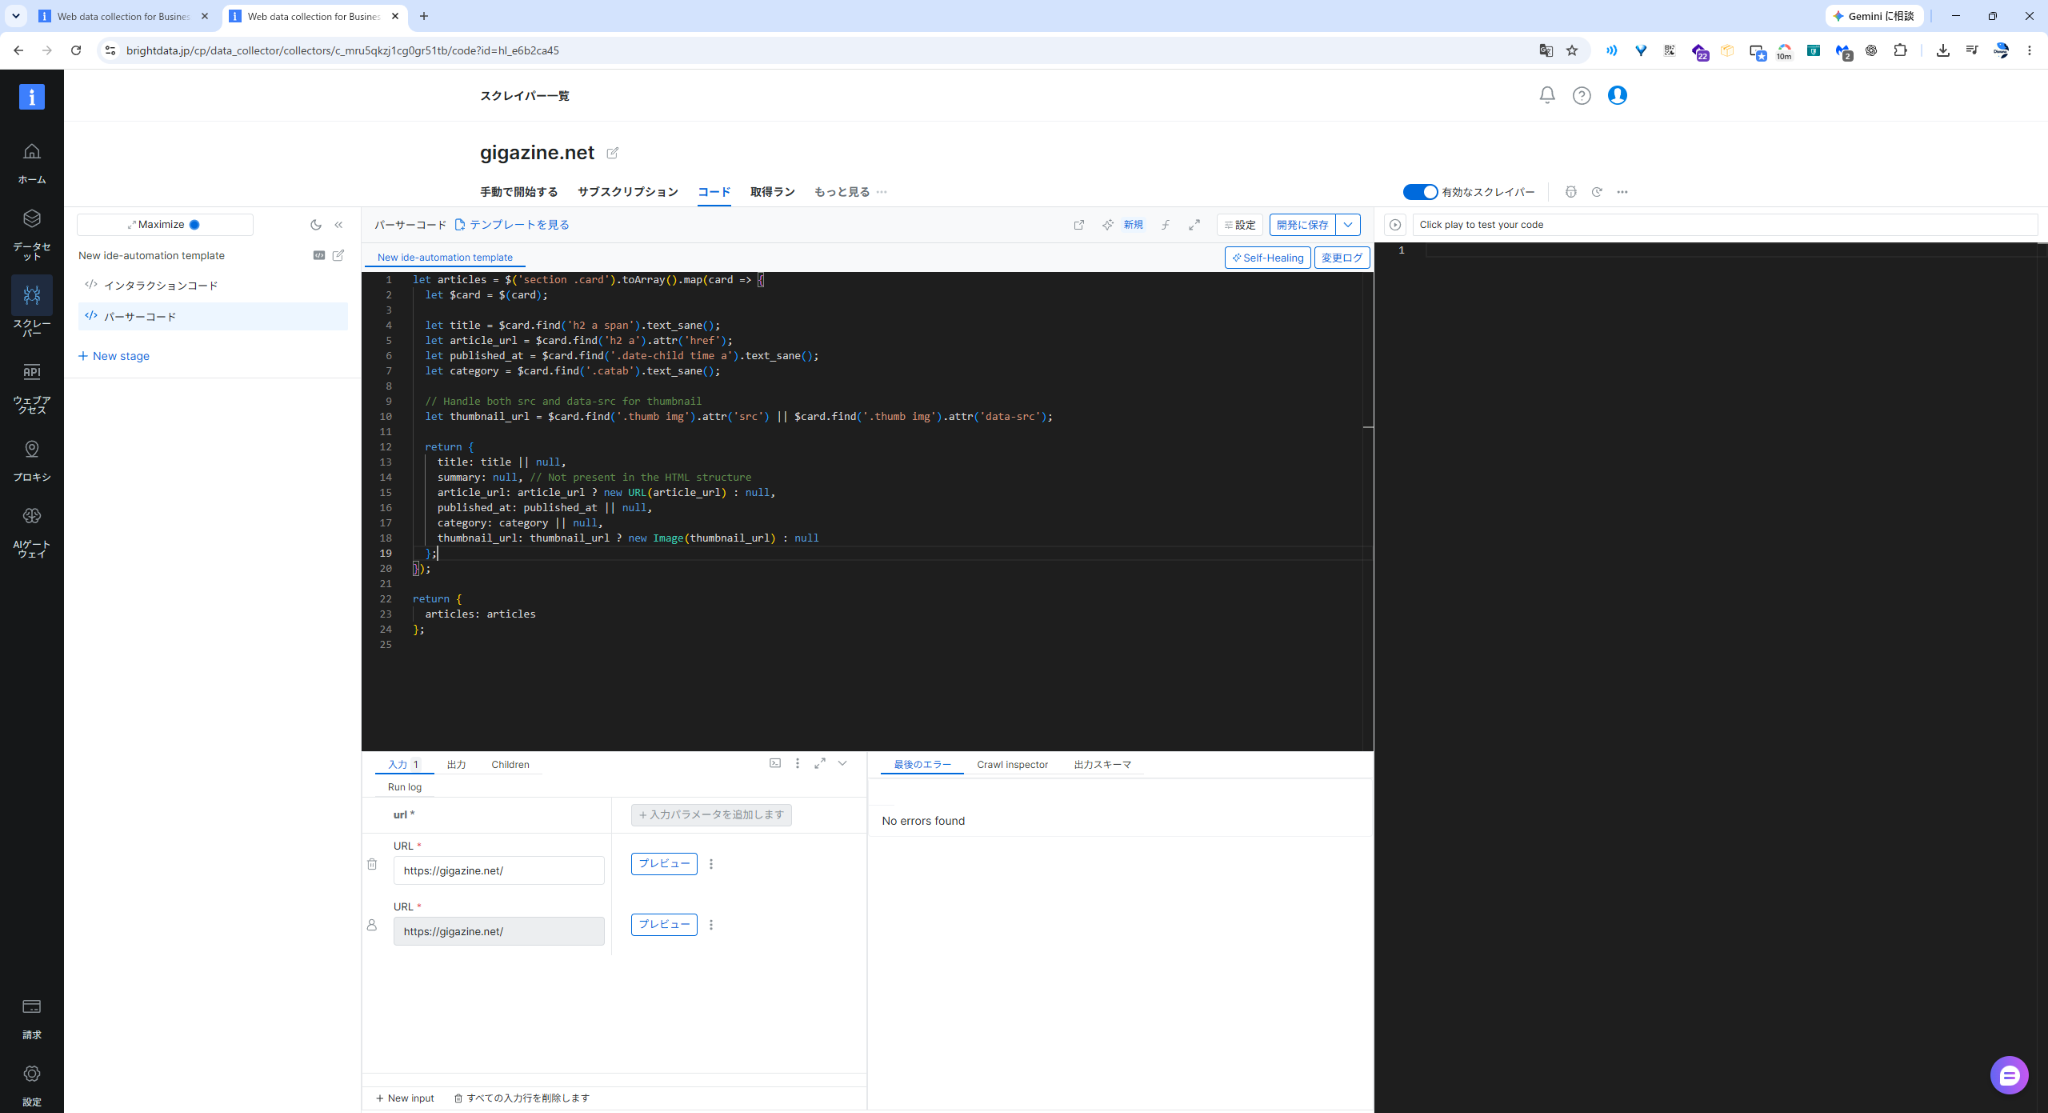
The interaction code was very short.
navigate(input.url);
collect(parse());
It navigates to the input URL and runs the parser to collect the results.
The generated code is JavaScript-based, but navigate() and collect() are not standard browser APIs. They’re functions provided by Bright Data’s execution environment.
On the parser side, it was getting article cards like this:
let articles = $('section .card').toArray().map(card => {
  let $card = $(card);

  let title = $card.find('h2 a span').text_sane();
  let article_url = $card.find('h2 a').attr('href');
  let published_at = $card.find('.date-child time a').text_sane();
  let category = $card.find('.catab').text_sane();

  let thumbnail_url =
    $card.find('.thumb img').attr('src') ||
    $card.find('.thumb img').attr('data-src');

  return {
    title: title || null,
    summary: null,
    article_url: article_url ? new URL(article_url) : null,
    published_at: published_at || null,
    category: category || null,
    thumbnail_url: thumbnail_url ? new Image(thumbnail_url) : null
  };
});

return {
  articles: articles
};
It converts elements matching section .card into an array with toArray(), then maps over all of them.
There’s no slice(0, 10) anywhere.
In natural language I had specified “up to 10 items,” but the generated code didn’t include any item limit.
As for summary, because no element to extract it from was found, the code always returned null. In the downloaded JSON, the summary field itself was omitted, so if you’re building downstream processing on a fixed schema, it’s safer to check the actual output too.
Asking AI to “fix it to 10 items”
You can edit the code directly.
But this time I tried fixing it with the Self-Healing feature.
The instruction I entered was:
Limit the output to the first 10 articles only.

Keep the existing fields and selectors unchanged.

Do not add pagination, scrolling, or navigation to individual article pages.

Update the parser code so that no more than 10 article records are returned.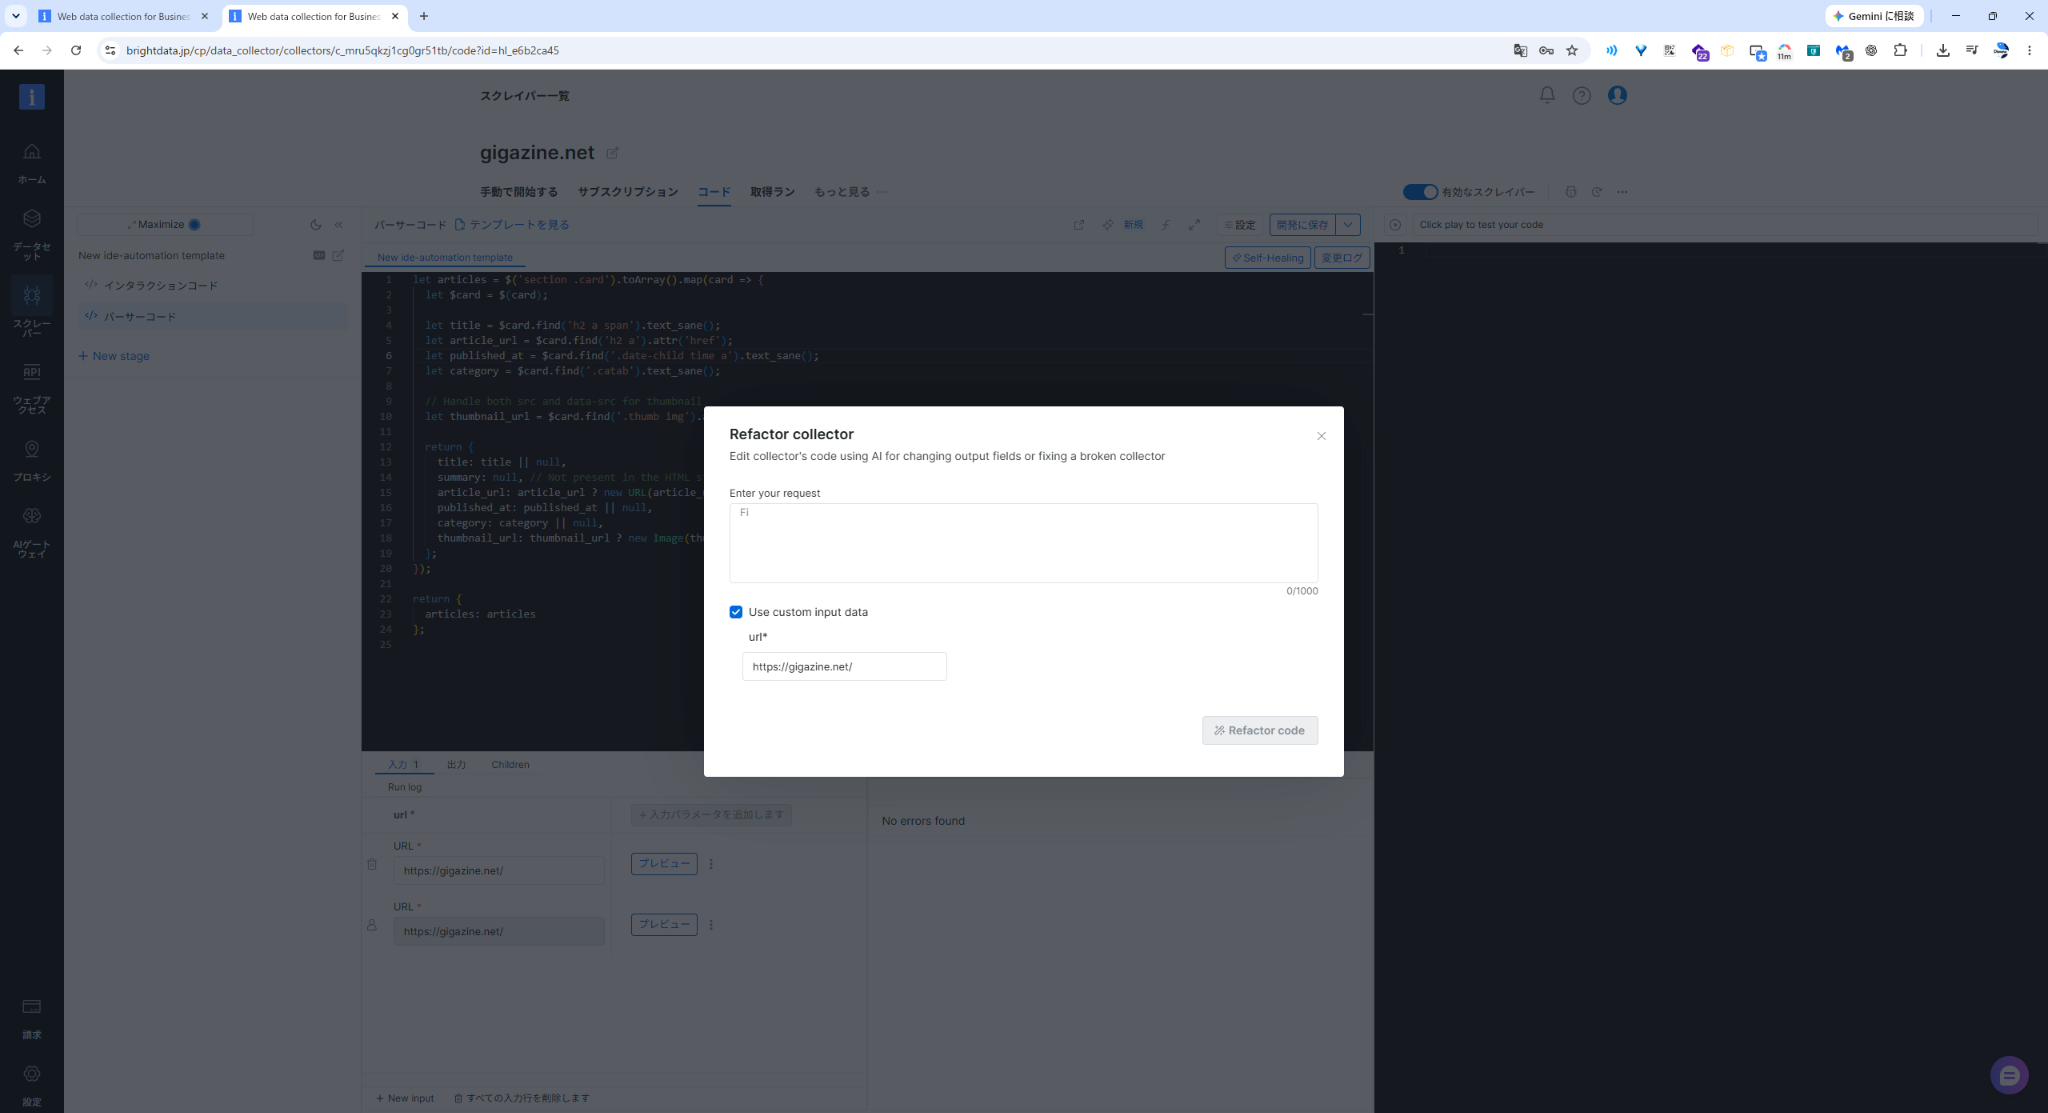
Once the AI’s fix finished, the before-and-after code was shown side by side.
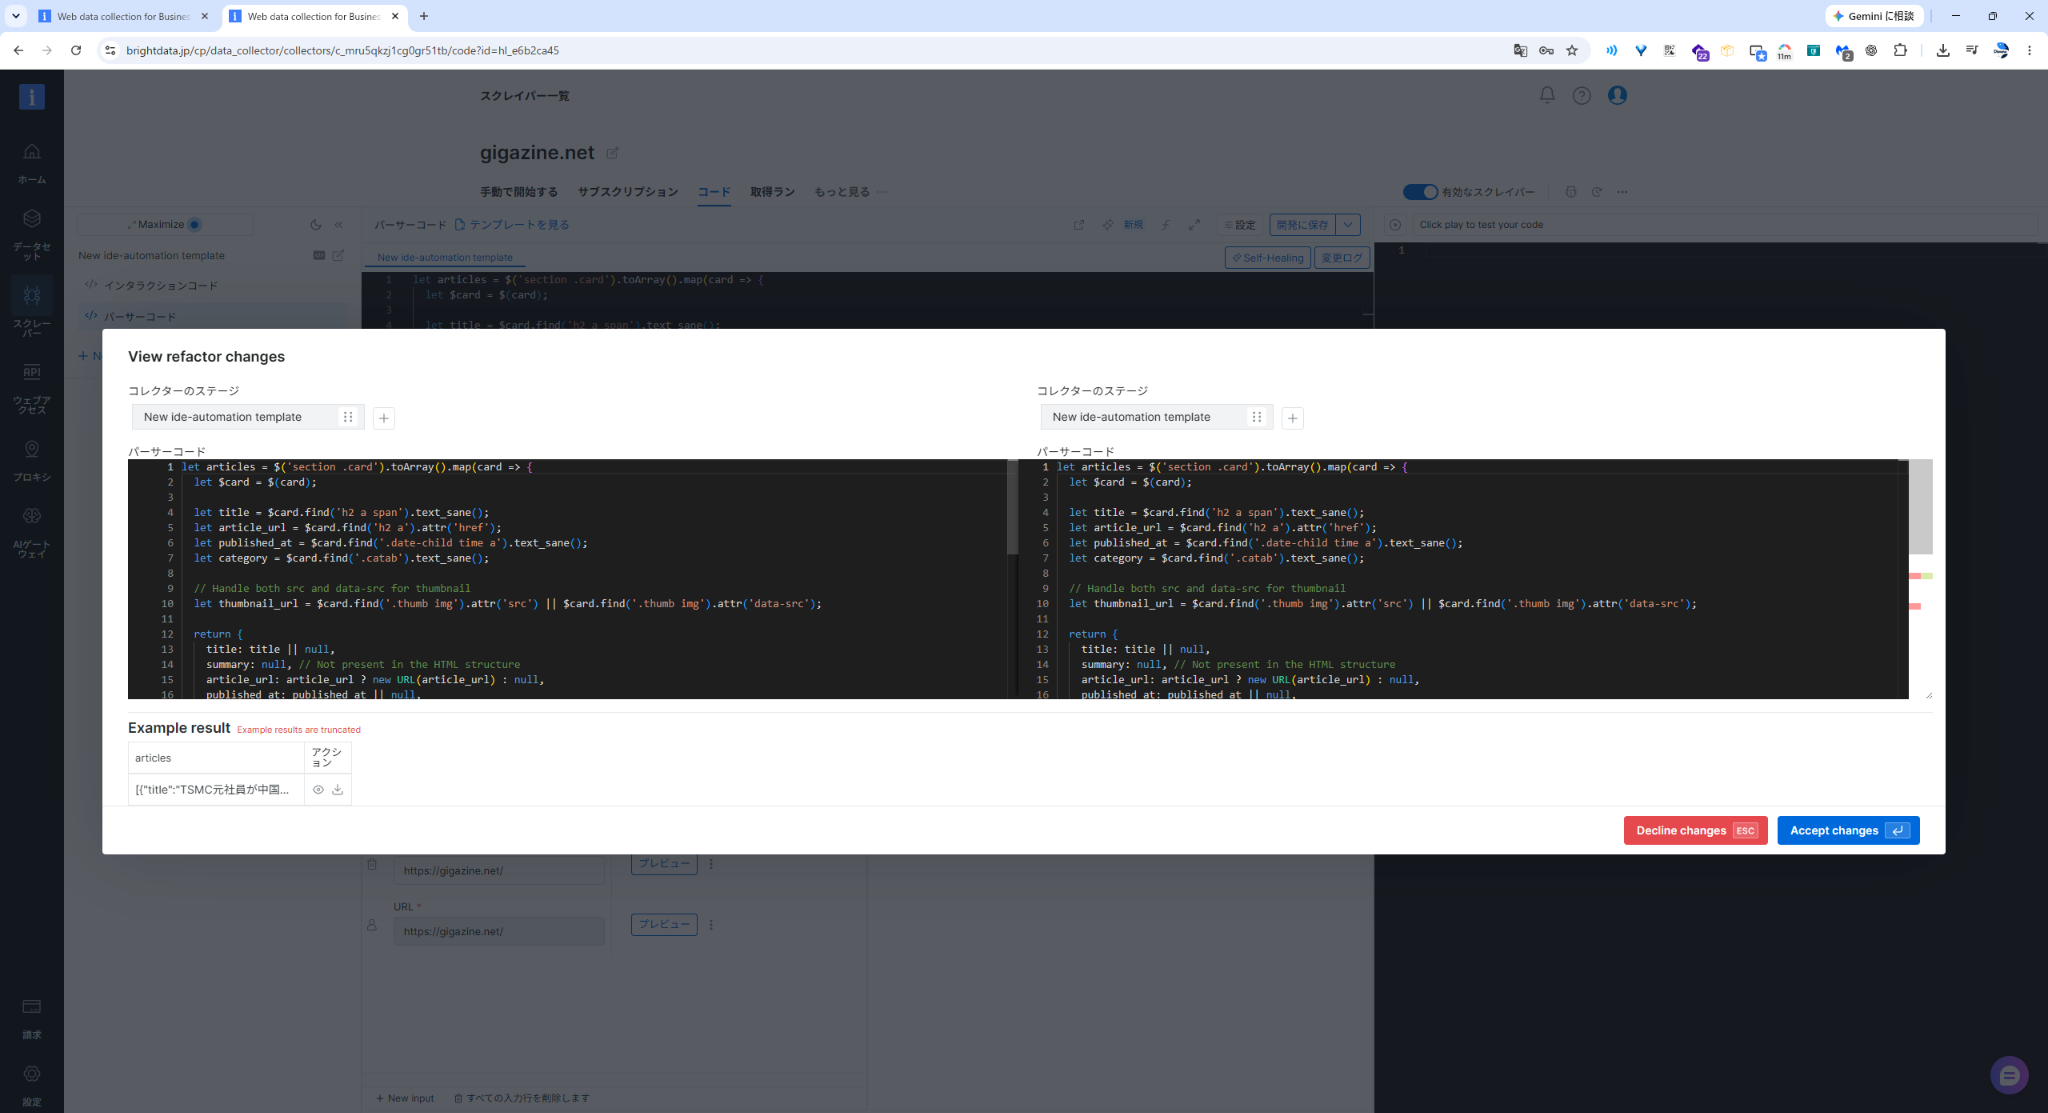
The only added line was:
}).slice(0, 10);This implementation generates the whole array first and then trims it to the first 10 items.
If you only care about processing cost, you could also put slice(0, 10) before map(). But for around 40 elements on the page, this is enough for the purpose here.
In this operation, the AI’s suggestion was first shown as a diff, and it was applied only after approval and save confirmation.
You review the before and after, and only move forward after pressing “Accept changes.”
You can leave a reason before saving
When I approved the diff, instead of being applied immediately, a screen appeared asking for an explanation of the change.
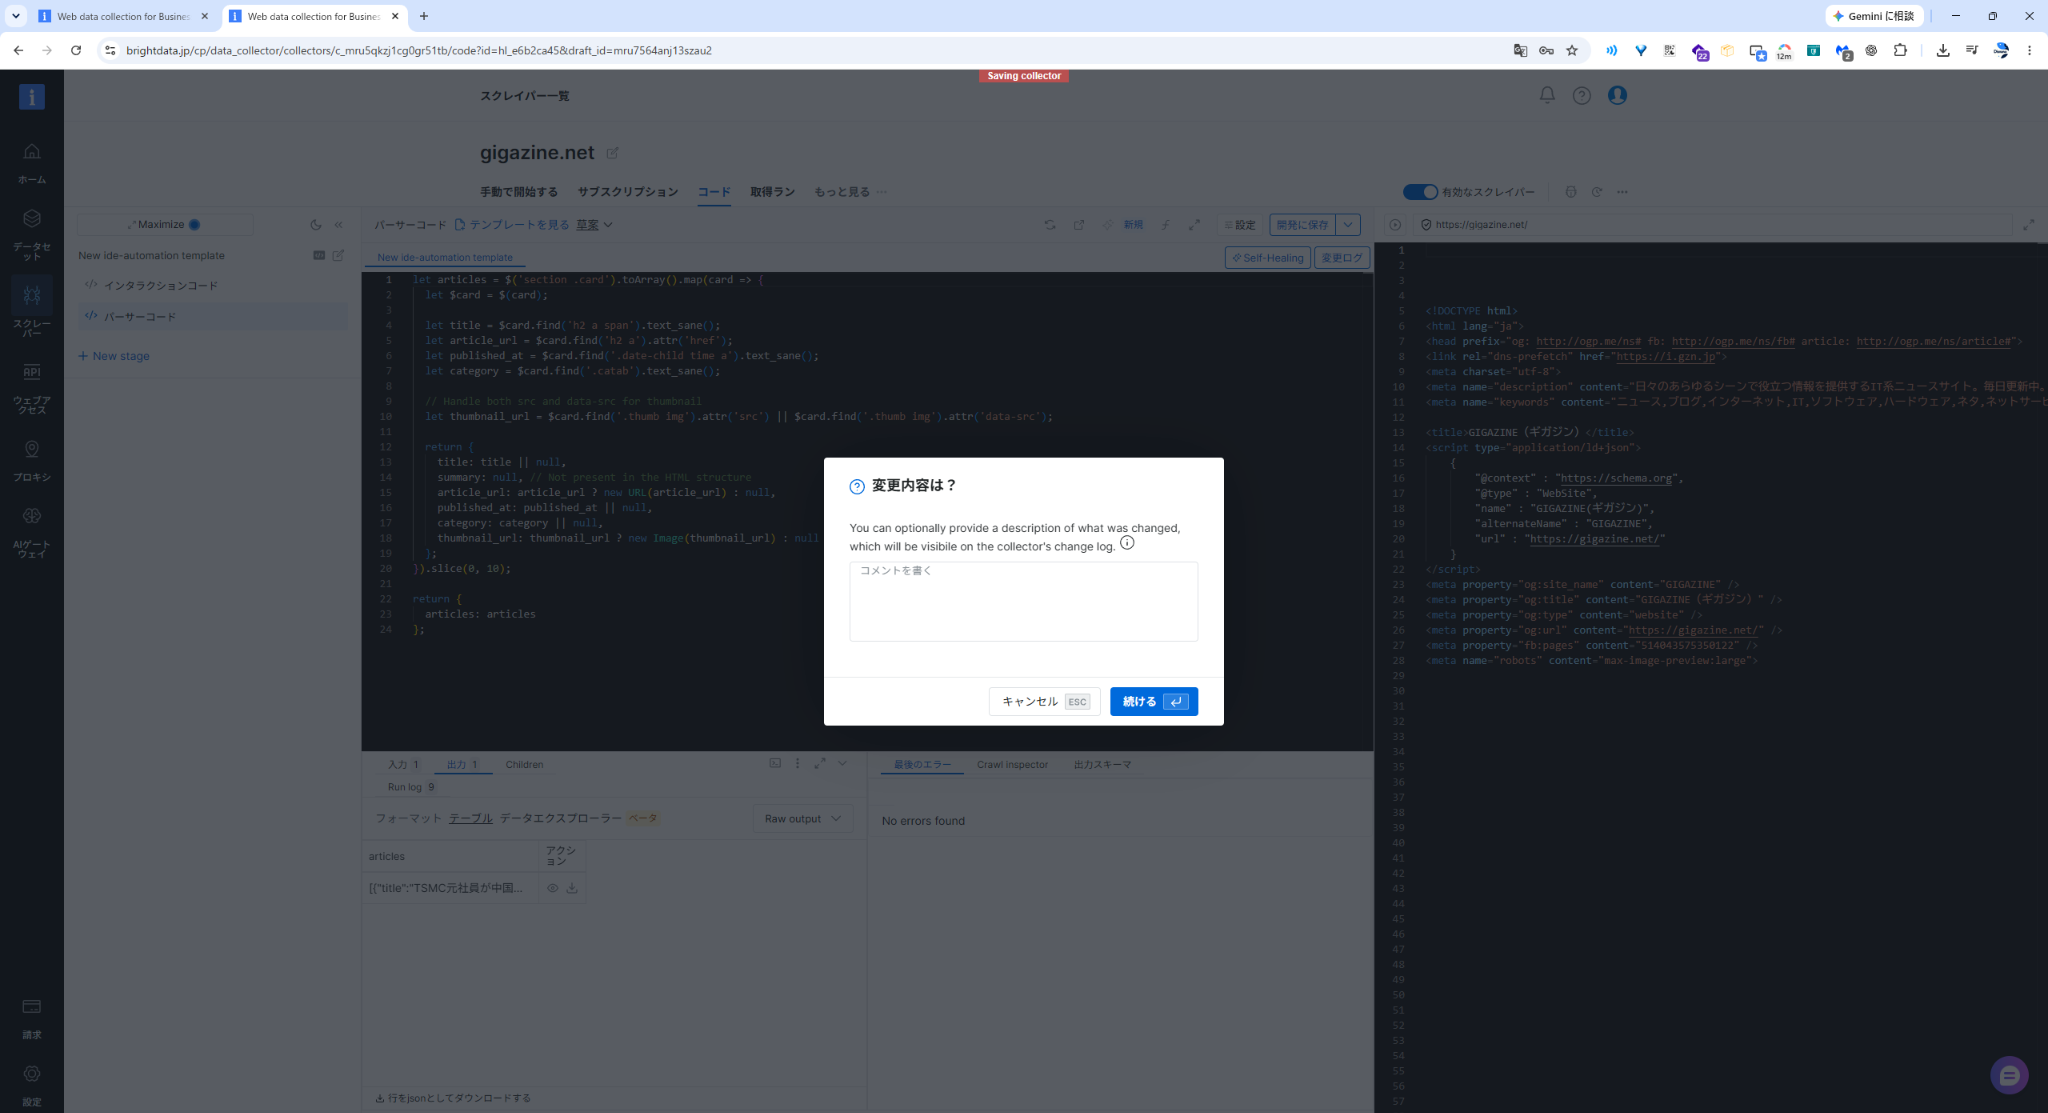
This time I recorded:
取得結果を先頭10件に制限するためEven with AI-generated changes, you can go through diff review, approval, comments, and saving.
It’s useful in operations that it doesn’t just generate code and end there—you can also leave the reason for the change.
It has drafts and change history
The IDE also had a draft change feature and a change log.
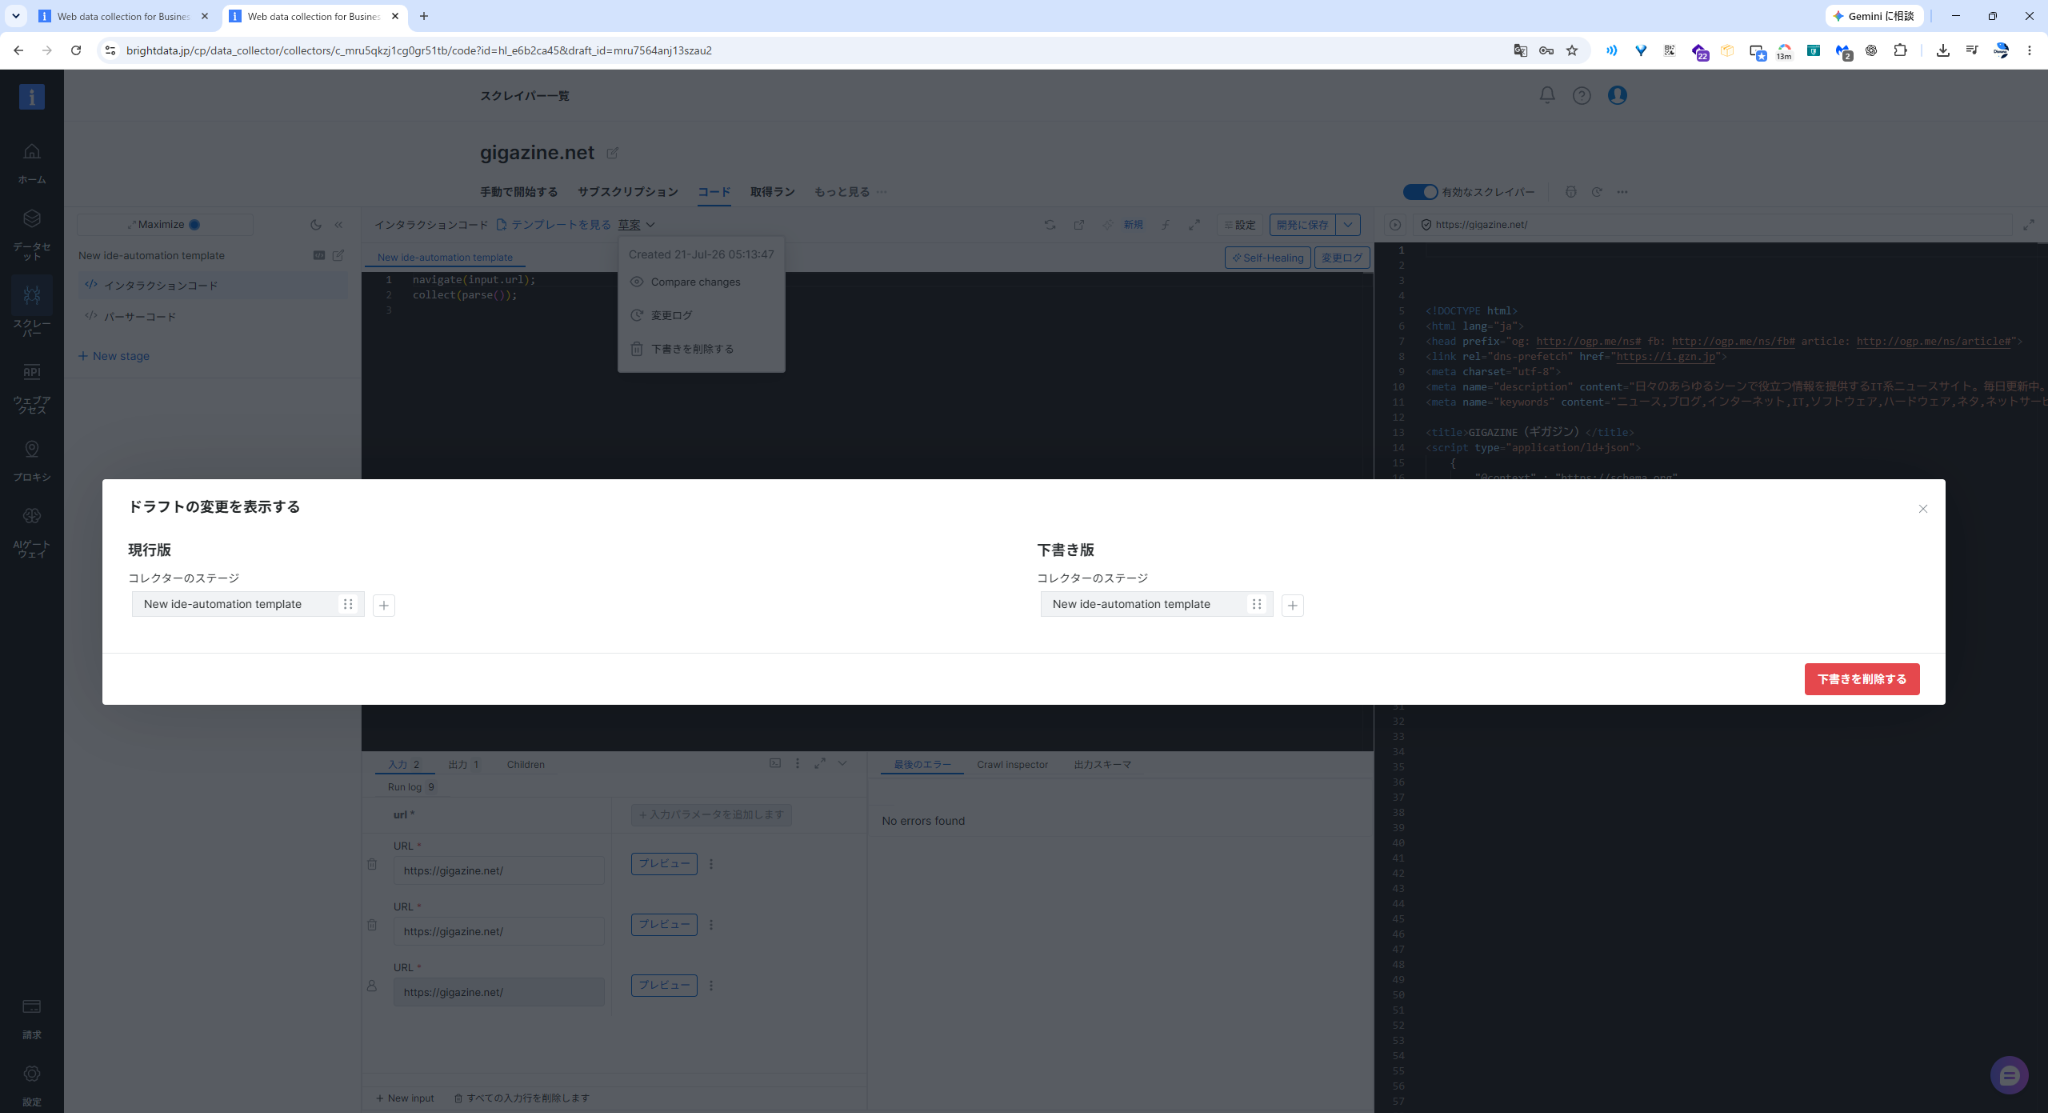
In this test, I was able to confirm the following states:
・AI-generated Version 1
・User-updated Version 2
・Unpublished draft
・User who made the change
・Date and time of the change
・Reason for the change entered at save time
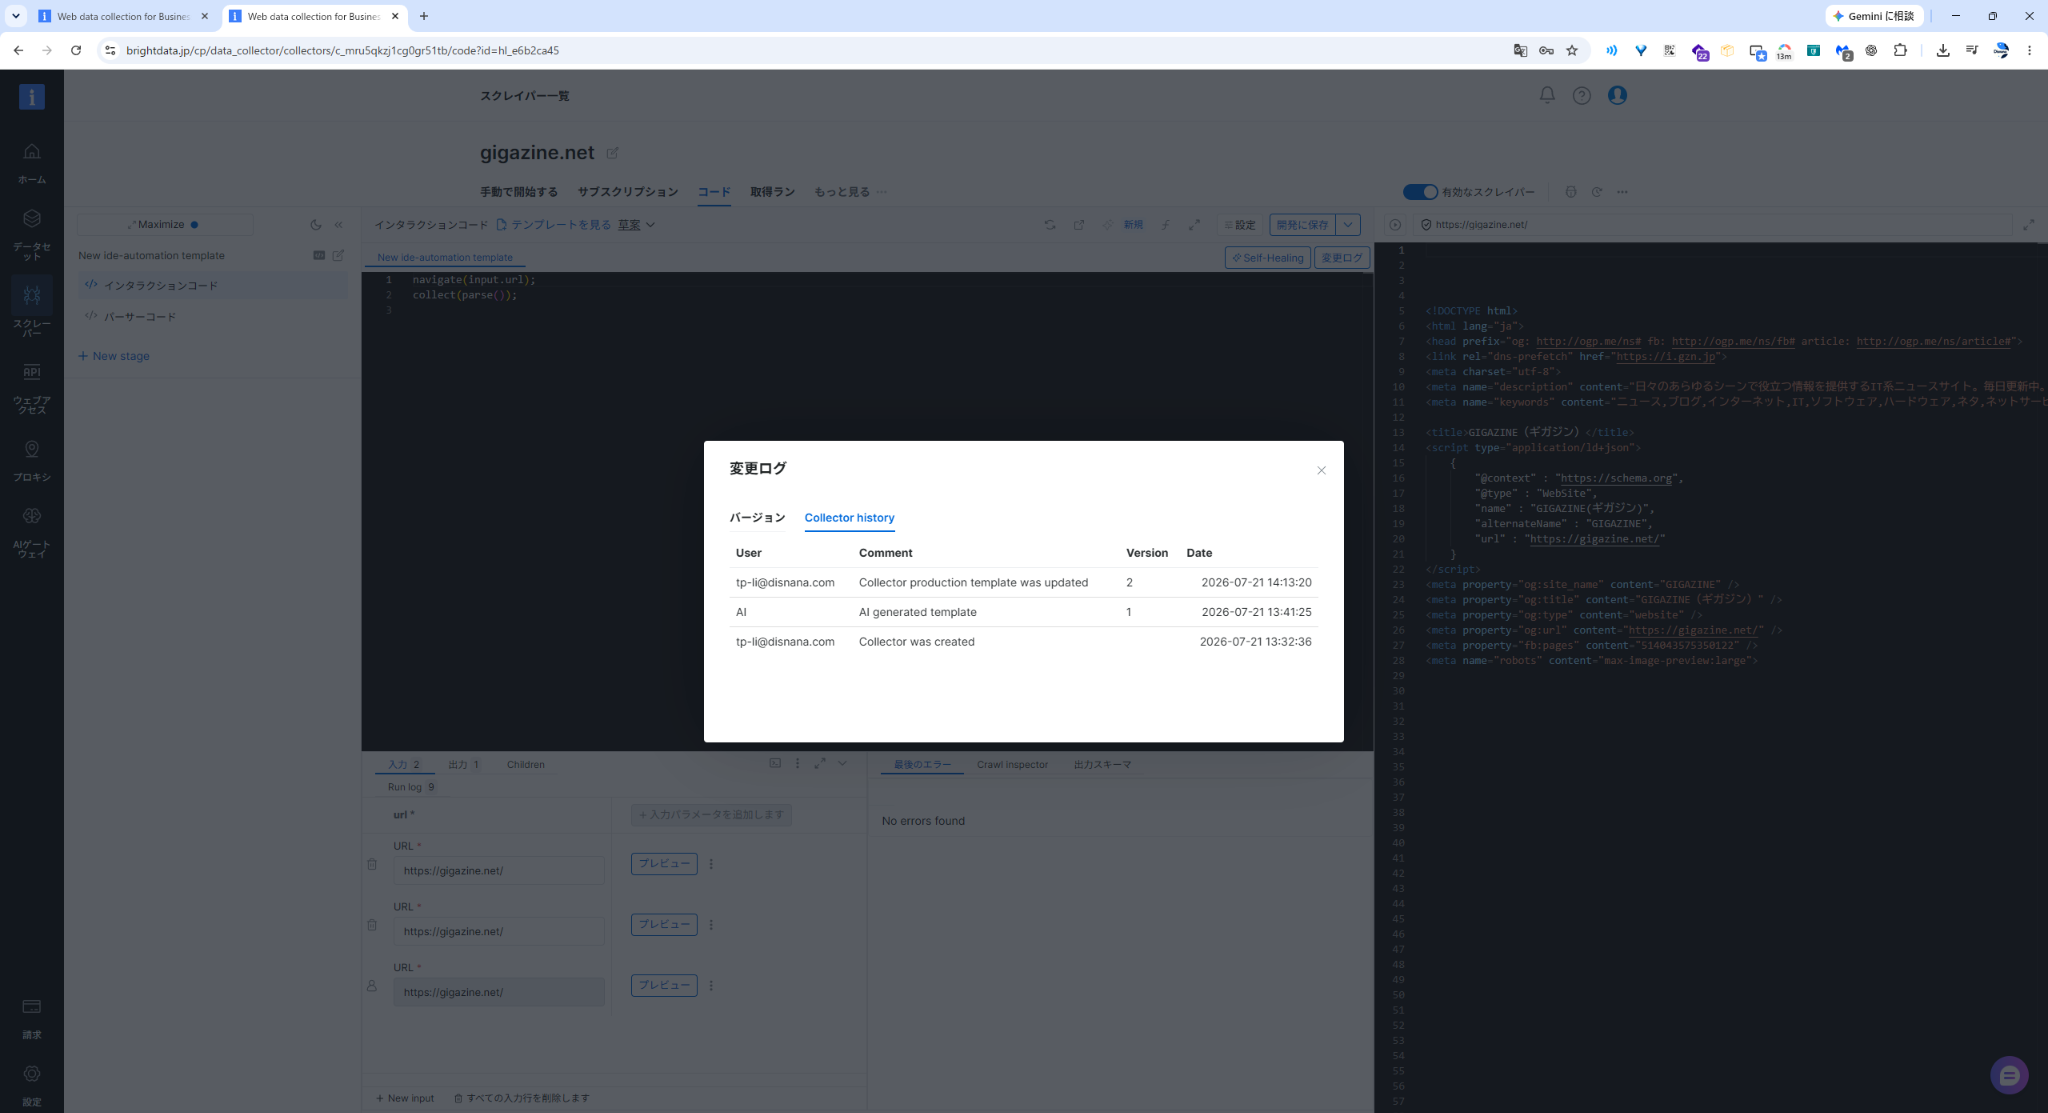
It’s not Git itself, but you can check versions, diffs, comments, and history.
With AI directly changing code, the scariest part is when something is applied without knowing what changed. In Scraper Studio, at least in the scope I touched this time, I was able to review the changes as a human before proceeding.
Approval and cancel also showed keyboard shortcuts, so the fine-grained usability of a web IDE was clearly considered.
After the fix, it became 10 items
When I saved the change and ran it again, it extracted only 10 items as specified.
| Check item | Before | After |
|---|---|---|
| Number of items extracted | 40 | 10 |
| Navigation to detail pages | None | None |
| Extracted fields | 5 items | 5 items |
Only the item limit changed with Self-Healing
The title, URL, date, category, and image URL were all kept as-is.
If I extract the first two of the 10 items, the result looks like this:
{
  "articles": [
    {
      "title": "TSMC元社員が中国に情報を売ろうとしたとして起訴される",
      "article_url": "https://gigazine.net/news/20260721-taiwan-indicts-ex-tsmc-employee/",
      "published_at": "07月21日13時45分",
      "category": "メモ",
      "thumbnail_url": "https://i.gzn.jp/img/2026/07/21/taiwan-indicts-ex-tsmc-employee/00_m.jpg"
    },
    {
      "title": "Claude Fable 5に匹敵する性能の中華AI「Kimi K3」が人気すぎてGPUが足りなくなり新規サブスク加入を一時停止する事態に、「Anthropicよりマシな対応」という声も",
      "article_url": "https://gigazine.net/news/20260721-kimi-k3-limit/",
      "published_at": "07月21日13時39分",
      "category": "AI",
      "thumbnail_url": "https://i.gzn.jp/img/2026/07/21/kimi-k3-limit/00_m.png"
    }
  ]
}
Other than the limit to 10 items, everything was preserved, and the title, URL, date, category, and image URL were still extracted.
It can output formats other than JSON too
Within the scope I checked, the execution result could be downloaded in the following formats:
・JSON
・NDJSON
・CSV
・XLSX
JSON and NDJSON are easy to pass to APIs or downstream processing.
CSV and XLSX did not automatically become 10 rows
With a top-level articles array like in this test, one execution result became one row, and the articles column stored the entire array as a JSON string.
The columns were structured like this:
articles
input_url
warning
warning_code
error
error_code
If you want to handle it directly in a spreadsheet, you’ll need to flatten the output schema or expand the articles array after downloading.
Things to check when scraping
Even if Scraper Studio automates the extraction process, it does not automate the judgment of whether you may retrieve, store, or reuse that data.
Before using it, you need to check the target site’s terms of use, robots.txt, copyright, whether personal data is included, and the access frequency.
In this test, I limited it to publicly available pages only, with no movement to detail pages, pagination, or infinite scroll, and kept it within the necessary scope for verification.
It can also connect to APIs and scheduled runs
The scraper you create isn’t limited to manual runs from the dashboard.
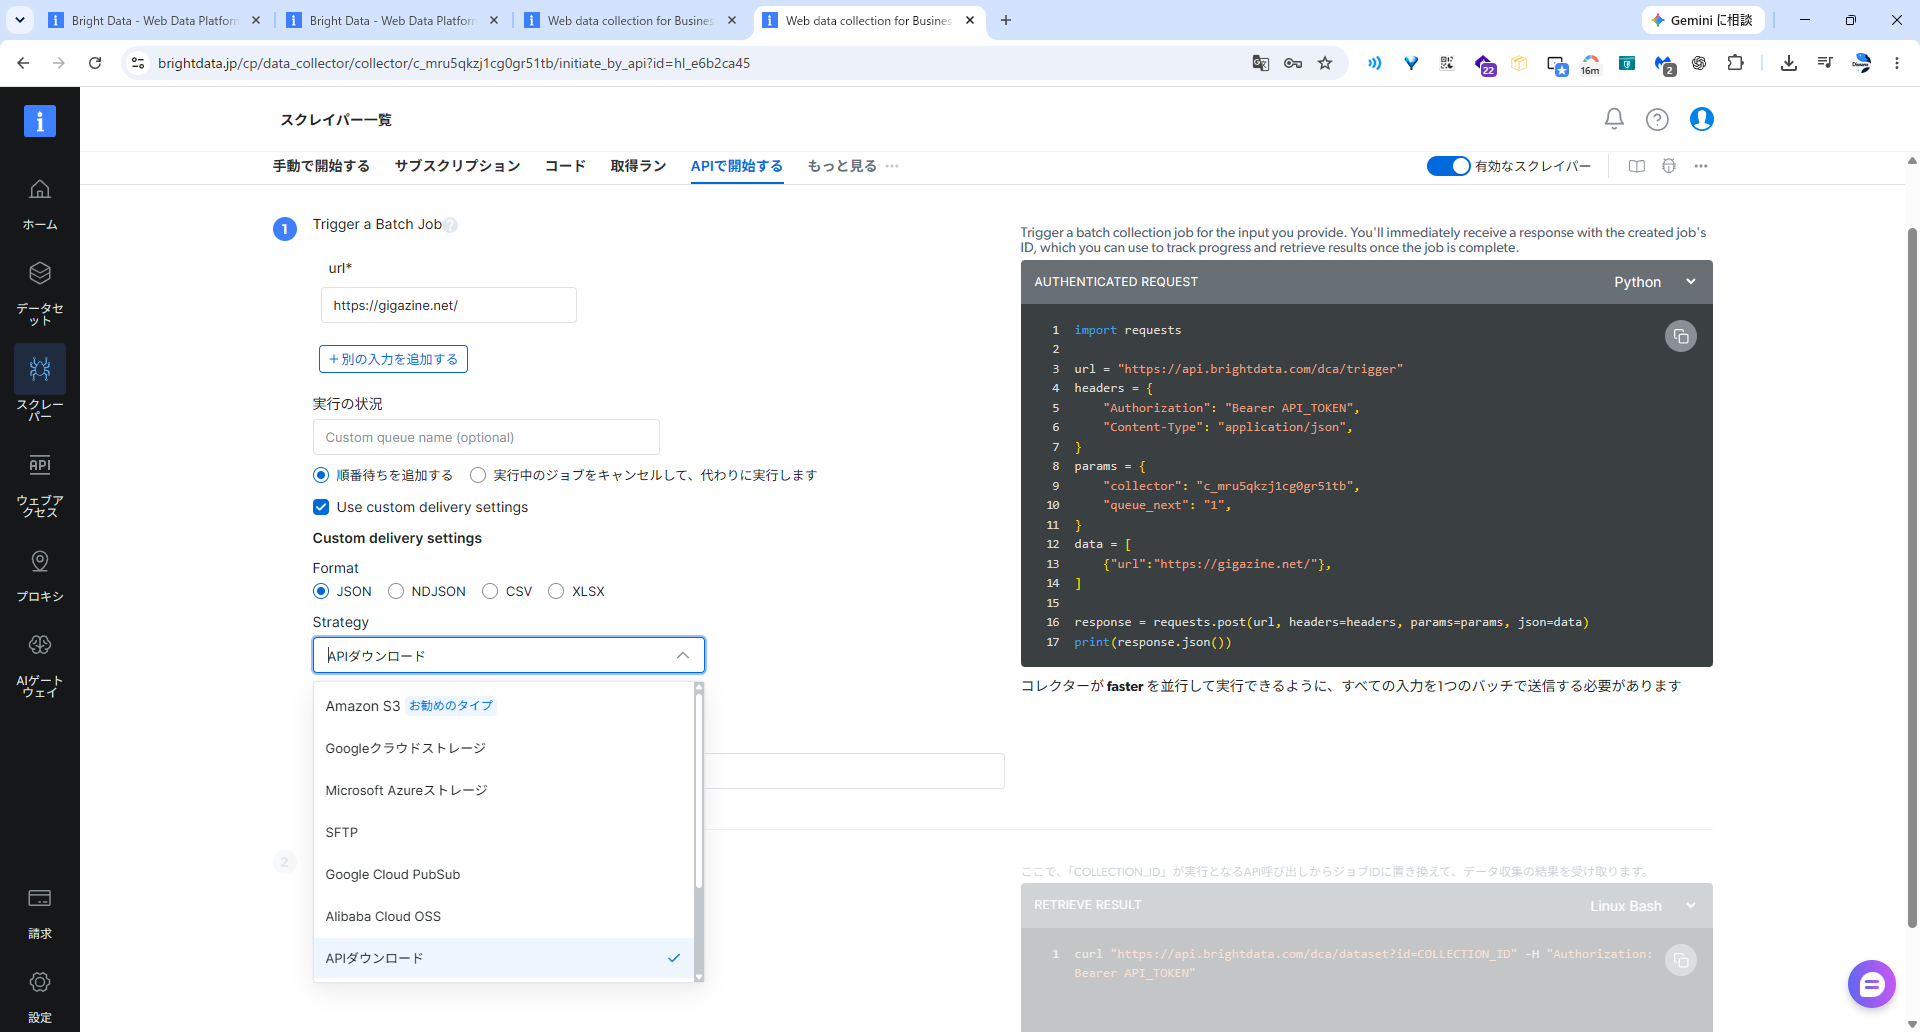
On the “Start with API” screen, if you configure the input values and queue handling, authenticated API code is shown on the spot.
You can check the API code on screen
This time I chose Python.
The generated code was set up to send the Collector ID and input URL to POST /dca/trigger and start batch collection.
Right after execution, a job ID is returned, and that ID is used to fetch the result from /dca/dataset. The authentication info in the code is shown as an API_TOKEN placeholder, so there’s no need to include the actual token in the article.
There’s also a language dropdown, so you can switch to sample code in another language depending on your use case.
You can also choose output format and delivery destination
Opening “Custom delivery settings” on the same screen let me specify the output format and delivery method.
The formats are these four:
| Type | Supported formats |
|---|---|
| Output format | JSON / NDJSON / CSV / XLSX |
| API | API download |
| Object storage | Amazon S3 / Google Cloud Storage / Microsoft Azure Storage / Alibaba Cloud OSS |
| Other destinations | SFTP / Google Cloud Pub/Sub |
Results can be sent not only by manual download, but also directly to existing storage or data processing infrastructure.
Running the API from PyCharm for real
Based on the Python example shown on screen, I added environment variable loading and polling to wait for the result.
The API token and Collector ID are loaded from environment variables.
Python code used for testing
import os
import time
import requests
from dotenv import load_dotenv

load_dotenv()

API_TOKEN = os.environ["BRIGHT_DATA_API_TOKEN"]
COLLECTOR_ID = os.environ["BRIGHT_DATA_COLLECTOR_ID"]

url = "https://api.brightdata.com/dca/trigger"
headers = {
	"Authorization": f"Bearer {API_TOKEN}",
	"Content-Type": "application/json",
}
params = {
	"collector": COLLECTOR_ID,
	"queue_next": "1",
}
data = [
	{"url":"https://gigazine.net/"},
]

response = requests.post(url, headers=headers, params=params, json=data)
resp_json = response.json()
if not response.ok:
	raise Exception(resp_json["message"])
if not "collection_id" in resp_json:
	raise Exception("No collection_id in response")
print(f"start > id: {resp_json['collection_id']}")

url = "https://api.brightdata.com/dca/dataset"
params = {
	"id": resp_json["collection_id"],
}

old_msg = ""
while True:
    response = requests.get(url, headers=headers, params=params)
    if response.ok:
        if not "status" in response.json():
            result = response.json()
            break
        if not response.json()["status"] in ["collecting", "building"]:
            raise Exception("Unexpected status")
        if old_msg != response.json()["status"]:
            old_msg = response.json()["status"]
            print(f'{response.json()["status"]} > {response.json()["message"]}')
    else:
        print("Error. Retrying in 5 seconds...")
    time.sleep(5)  # Wait for 5 seconds before the next request
print(result)
When I ran it, it first returned a collection_id.
After that, the status changed to collecting and then building, and once it was ready I could get JSON containing 10 article records.
start > id: j_...
collecting > Job is not finished
building > Dataset is not ready yet, try again in 30s
[{"articles": [...10件...], "input": {"url": "https://gigazine.net/"}}]

プロセスは終了コード 0 で終了しました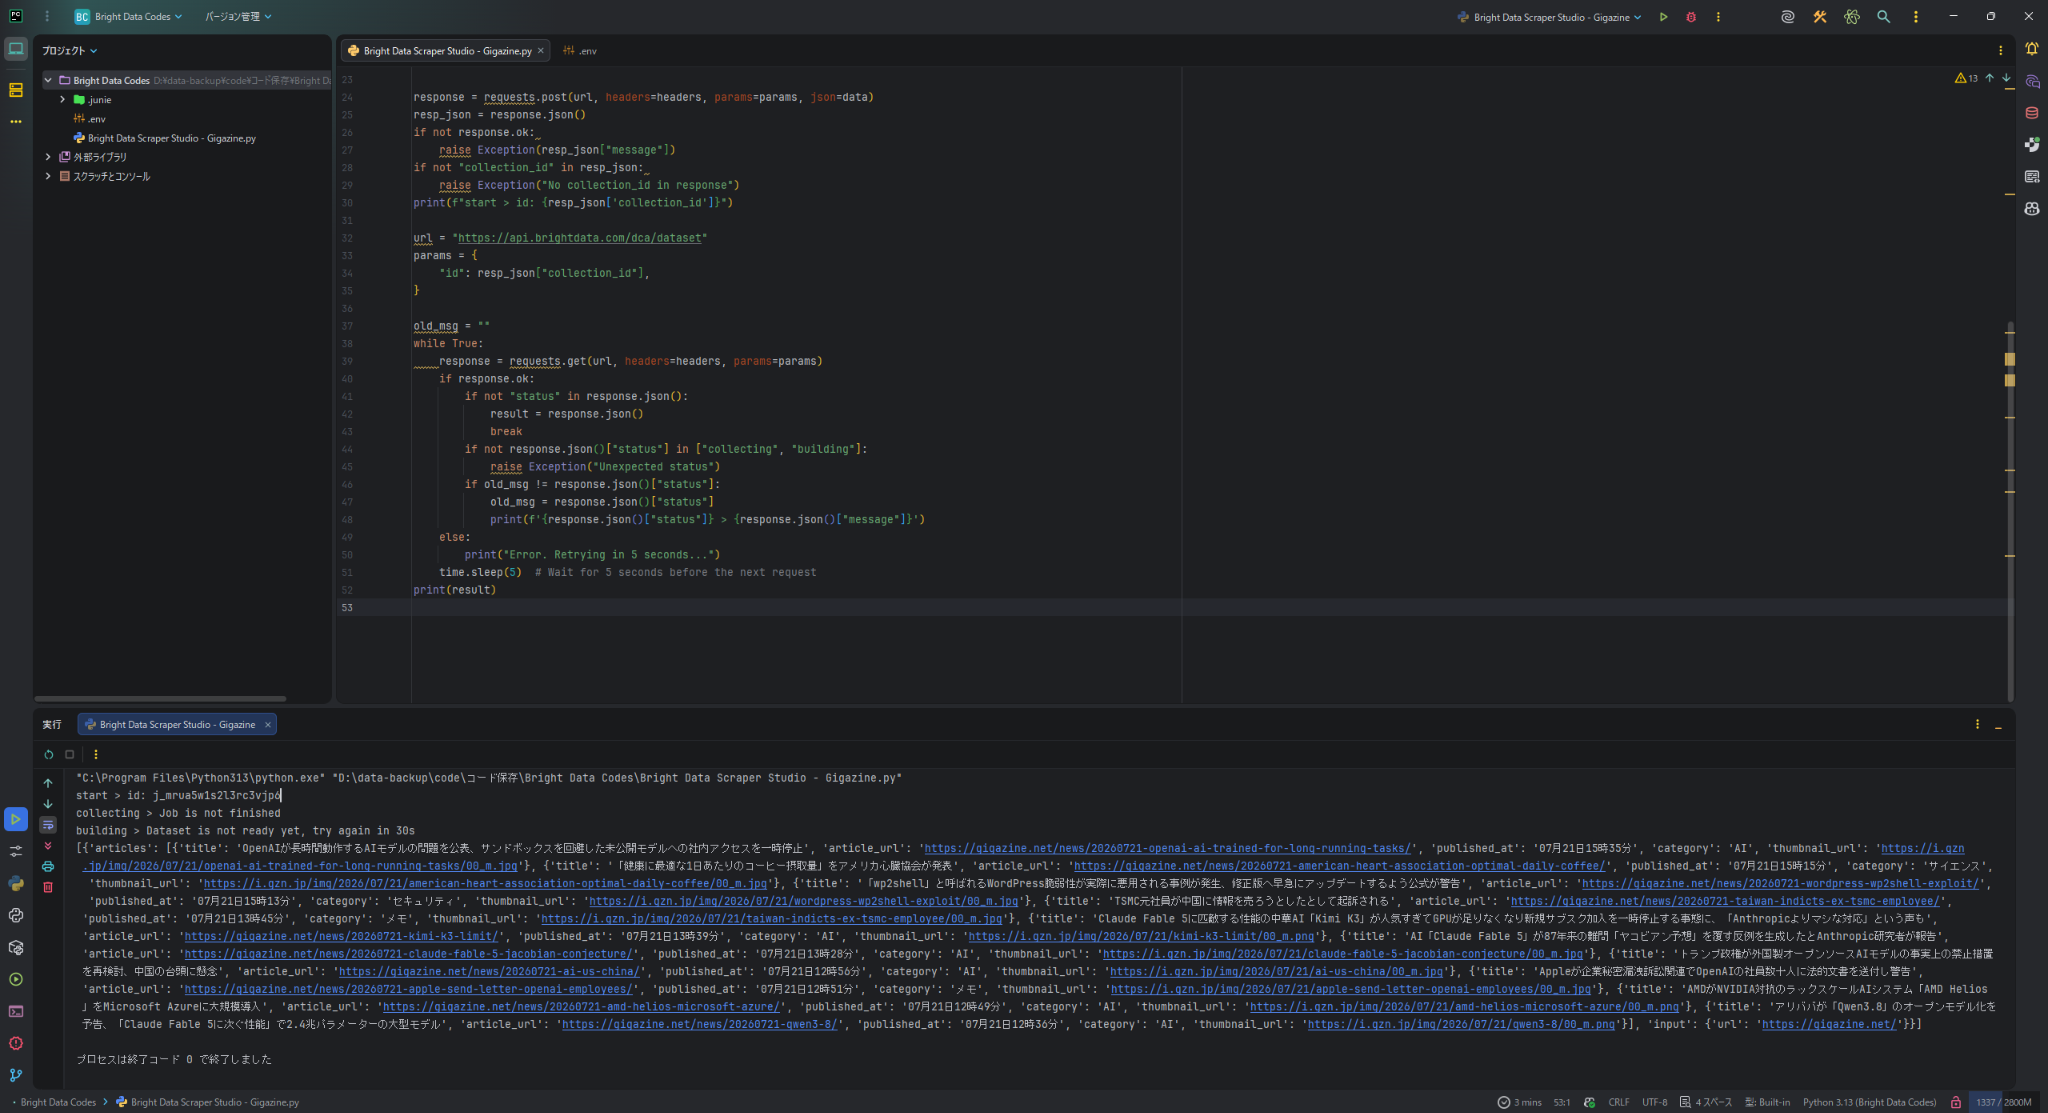
Got 10 items through the API too
I started the Collector from PyCharm, went through collecting and building, and got the 10 items after Self-Healing.
The code here is a simple implementation for verification. For ongoing use, it’s safer to add HTTP timeouts, a maximum wait time, retry counts, and backoff handling.
Scheduled runs can be set from the web UI
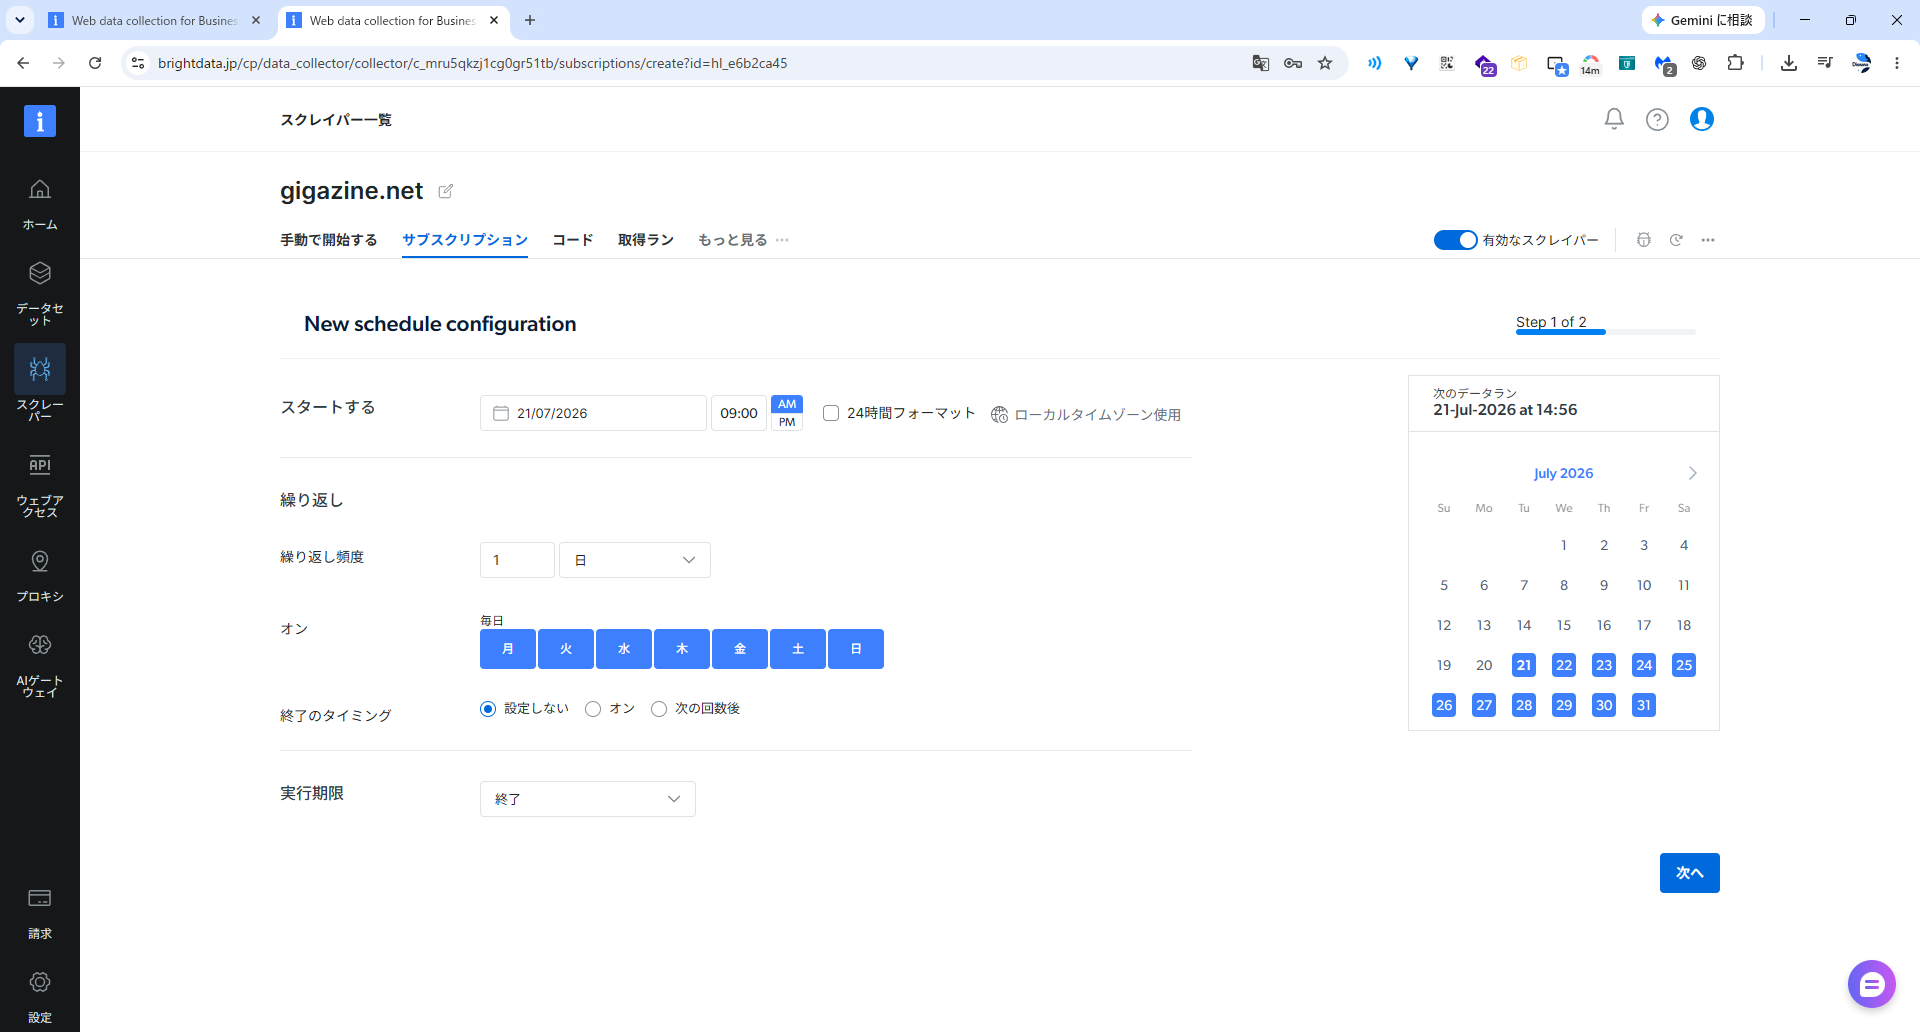
In “Subscription,” you can configure the start date and time, time zone, repeat interval, weekdays, and end conditions right from the screen.
You can also set a rate limit per scraper, limiting how many sessions can start per minute.
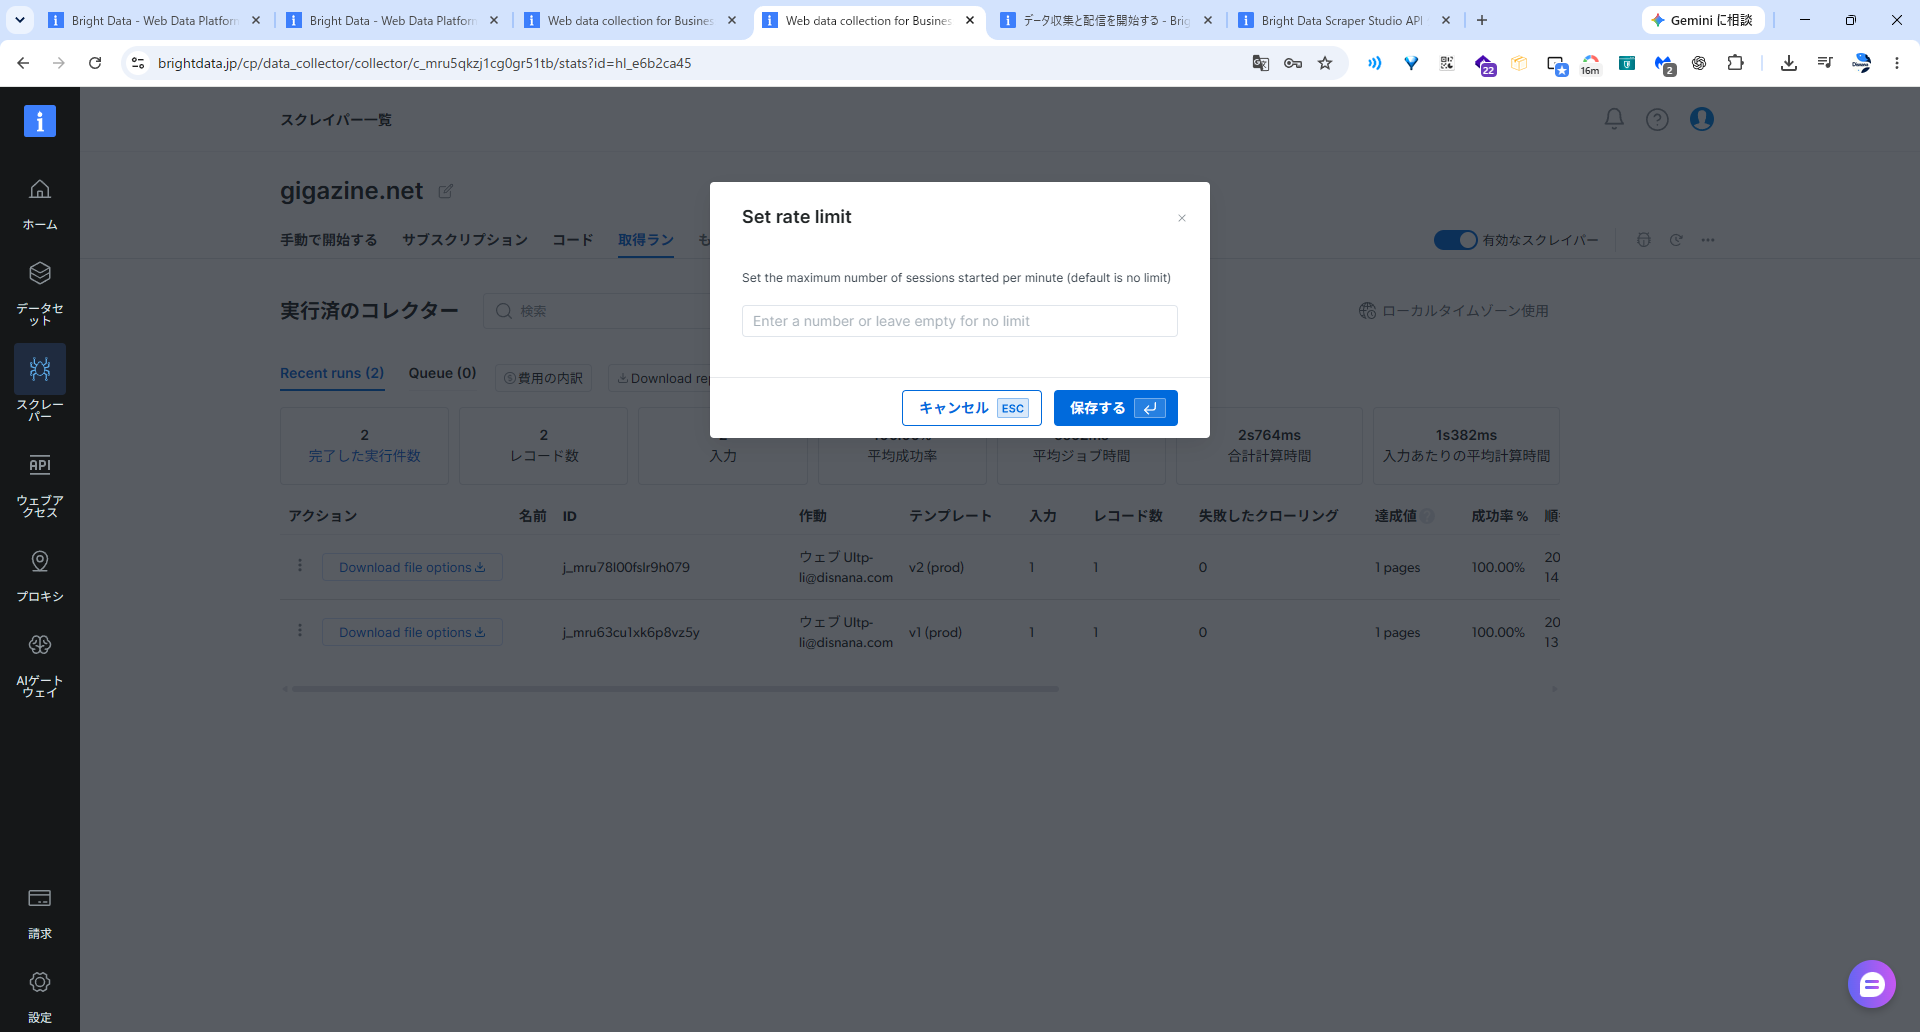
When using APIs or scheduled runs, you can set an upper limit so the process doesn’t pile up in a short time. That said, setting a rate limit does not mean you no longer need to check terms of use or access load.
Possible operation examples for a GIGAZINE scraper
・Fetch the top page at a fixed time every day
・Aggregate the number of articles by category for the day
・Save only articles in the AI category
・Record differences from the previous day
・Summarize trends for the month at the end of the month
After generating the scraper, you can move on to API execution, scheduled collection, and delivery to external storage without preparing a separate execution environment or cron from scratch.
This time, after checking the API code and delivery destinations on screen, I actually started the Collector from PyCharm and got 10 results. I also checked the schedule and rate limit settings screens. I did not go as far as actual delivery to external storage or continuous scheduled operation.
What I found from actually using it
What was good
You can read the generated code yourselfSome AI-generated services hide what they’re doing under the hood. In Scraper Studio, I could open the JavaScript code and check the CSS selectors and data transformations.
You can fix it in natural language and apply it after checking the diffI was able to fix the code just by asking it to “limit it to 10 items.” Since changes are only applied after comparing the before/after and approving them, you don’t have to blindly trust the AI fix.
Operational features are all in the same place after creationAPI, scheduling, output, and change history are all bundled with the same scraper. Unlike AI tools that only generate code, this setup made it easy to connect the scraper to regular collection.
Most of the UI is localized into JapaneseMain operations like schema review, execution, code editing, and change logs could be done in a Japanese UI. Some descriptions and buttons remain in English, but there weren’t many moments where I felt lost.
What bothered me
Natural language conditions don’t always make it into the codeThis time, my “up to 10 items” condition was not reflected in the first generated code. Conditions related to cost or load, such as item count, pagination, and navigation to detail pages, need to be checked in both the code and the execution result.
Extra instructions duplicated the schemaWhen adding summary, the same field was generated at the top level and inside the array. It could be fixed, but it still seems worth checking the structure after additional edits.
The first Japanese attempt produced an error. Since rerunning the same instruction succeeded, I can’t say the language was the cause.
CSV and XLSX don’t automatically flatten nested arraysIf you expect to handle it directly in spreadsheet software, you need to think about the output structure.
Who it seems suited for
People it seems suited for
・People who want to adapt to new target sites quickly
・People who want to review and edit generated code themselves
・People who want to reduce the effort of building execution infrastructure and scheduled runs separately
・People who want to create a starting point in natural language and fine-tune it themselves
・People who want to manage multiple scrapers with history attached
It’s better not to leave everything to it completely
This time too, the item-count condition was not reflected in the first generation alone. Rather than fully no-code, I think it’s closer to an environment where AI handles the initial implementation, and the developer takes over the necessary parts.
Summary
Using only a URL and natural language, I was able to create scrapers for Books to Scrape and GIGAZINE.
For Books to Scrape, I could extract data for 20 books without any manual fixes.
For GIGAZINE, I also generated the schema from Japanese instructions and could extract the title, URL, publication date, category, and thumbnail.
On the other hand, the “up to 10 items” condition was not reflected in the first code, and it returned 40 items.
After that, I checked the generated JavaScript in the IDE and asked Self-Healing to fix it. I reviewed the diff, approved it, left the reason in the history, and finally limited it to 10 items.
What I found useful in practice wasn’t just the first AI generation.
Being able to handle code review after generation, natural-language fixes, diff review, drafts, version history, API, and scheduling as one continuous scraper flow was a big plus.
You shouldn’t just send the first generated version straight into production.
Even so, if you’re someone who keeps rebuilding everything from scratch—from selector research to API execution and scheduled processing—this should save a lot of effort.
How to try Bright Data for free
The Scraper Studio used in this article can be accessed by signing up for Bright Data from this dedicated link.
If you register from the dedicated link, you can use 5,000 free requests per month.
First, you can use the free quota to actually try the Scraper Studio creation and scraping introduced in this article.
After signing up, you can use Scraper Studio with the following steps:
- Access Bright Data from the dedicated link
- Create a new account and log in
- Open Scraper Studio from the Bright Data dashboard
- Create a new scraper
- Set the target site and the data you want to extract, then run it
About the free quota
If you sign up from the dedicated link, you can use 5,000 free requests per month.
Since you can get started without a credit card, it’s easy to try if you just want to see what Scraper Studio is like.